Arduino Tutorials – Lesson 19 – Sound And Light Program Using Arduino UNO

Creating LEDs flash program Using Sound sensor

Required Components

  1. Arduino UNO -1 no
  2. Sound sensor -1 no
  3. Resistor 150 ohm -6 no
  4. LEDs -6 no
  5. Connecting wires -1 set

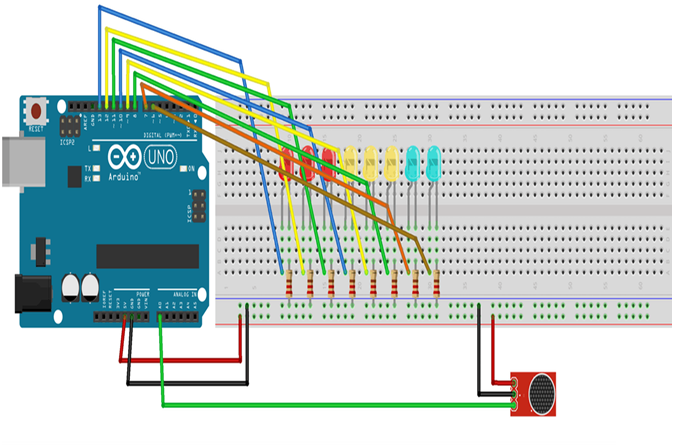
Circuit

Steps

  1. Make sure the components are working properly.
  2. Connect the Sound sensor to the Arduino UNO board.
  3. Connect the Arduino UNO board 8, 9 ,10 ,11 ,12 ,13- pins to the LEDs.
  4. Connect the Arduino UNO board A0 pin to the Sound sensor.
  5. Connect the 150 Ohm Resistor to all the LEDs.
  6. Connect Sound sensor board VCC, GND to 5V, GND of Arduino Uno Board.
  7. Check the Cicuit Connections.
  8. Check the Arduino program.
  9. Run the Arduino program.

Arduino Program

int ledPin1= 8; 
int ledPin2= 9;
int ledPin3= 10;  
int ledPin4= 11;
int ledPin5= 12;
int ledPin6= 13;
int sensorPin= A0; 
int val = 0;

void setup( )
{
  pinMode(ledPin1, OUTPUT); 
  pinMode(ledPin2, OUTPUT);
  pinMode(ledPin3, OUTPUT);
  pinMode(ledPin4, OUTPUT);
  pinMode(ledPin5, OUTPUT);
  pinMode(ledPin6, OUTPUT);
  pinMode(sensorPin, INPUT); 
  Serial.begin (9600);
}

void loop (  )
{
  val =analogRead(sensorPin);
  Serial.println (val);
  if (val >= 127) 
  {
    digitalWrite(ledPin1, HIGH); 
  }else {
    digitalWrite(ledPin1, LOW);
  }
  if (val >= 378) 
  {
    digitalWrite(ledPin2, HIGH);
  }else {
    digitalWrite(ledPin2, LOW);
  }
  if (val >= 505) 
  {
    digitalWrite(ledPin3, HIGH);
  }else {
    digitalWrite(ledPin3, LOW);
  }
  if (val >= 632)
  {
    digitalWrite(ledPin4, HIGH);
  }else 
  {
    digitalWrite(ledPin4, LOW);
  }
  if (val >= 759) {
    digitalWrite(ledPin5, HIGH);
  }else 
  {
    digitalWrite(ledPin5, LOW);
  }
  if (val >= 886)
  {
    digitalWrite(ledPin6, HIGH);
  }else 
  {
    digitalWrite(ledPin6, LOW);
  }
}

Usage

  1. Security system for Office or Home
  2. Spy Circuit
  3. Home Automation
  4. Smart Phones
  5. Ambient sound recognition
  6. Audio amplifier

Projects

  1. Lightning cloud

Arduino Tutorials – Lesson 18 – A Solenoid Valve Control Using Arduino UNO

Creating A Solenoid Valve program using Arduino UNO

Required Components

  1. Solenoid valve -1 no
  2. Darlington Transistor -1 no
  3. Resistor(10K) -1 no
  4. IN4001 Diode -1 no
  5. Arduino UNO -1 no
  6. Bread board -1 no
  7. Connecting wires -1 set

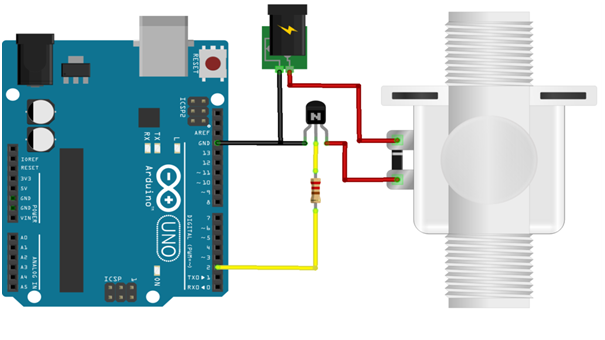
Circuit

Steps

  1. Make sure the components are working properly.
  2. Connect the Transistor to the Arduino UNO board & Solenoid valve.
  3. Connect the 10K resistor to the Transistor.
  4. Connect the Power supply to the Solenoid valve.
  5. Connect the Solenoid valve to the Arduino UNO board.
  6. Connect the 10K resistor to the 2nd pin of Arduino UNO board.
  7. Check the Cicuit Connections.
  8. Check the Arduino program.
  9. Run the Arduino program.

Arduino Program

int solenoidPin = 9;
                                   
void setup( )
{
  pinMode(solenoidPin, OUTPUT);          
}

void loop( )
{
  digitalWrite(solenoidPin, HIGH);           
  delay(1000);                                             
  digitalWrite(solenoidPin, LOW);            
  delay(1000);                                             
}

Usage

  1. Computer printers
  2. Fuel injection gear
  3. Vehicles like cars
  4. Industrial setting

Arduino Tutorials – Lesson 17 – Soil Moisture Sensor Using Arduino UNO

Creating Soil Moisture Sensor program using Arduino UNO

Required Components

  1. Soil sensor -1 no
  2. Arduino UNO -1 no
  3. Connecting Wires -1 set

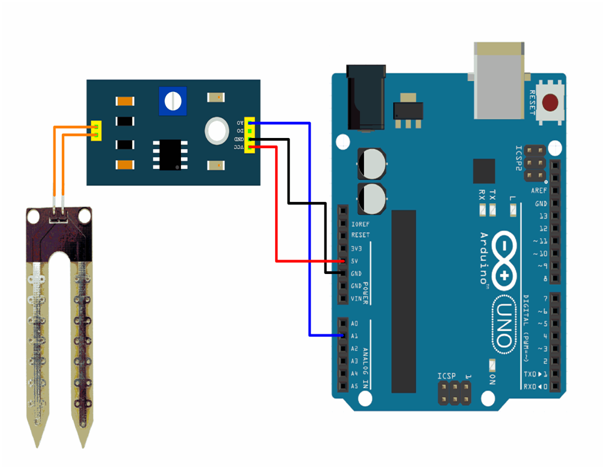
Circuit

Steps

  1. Make sure the components are working properly.
  2. Connect the Soil moisture to the Arduino UNO board.
  3. Connect the Arduino UNO board A0 pin to the Soil moisture(Analog or Digital).
  4. Connect the interfacing to the Arduino UNO board.
  5. Connect Humidity Sensor board VCC, GND to 5V, GND of Arduino Uno Board.
  6. Check the Cicuit Connections.
  7. Check the Arduino program.
  8. Run the Arduino program.

Arduino Program

int sensorPin = A0;
int sensorValue;
int limit = 300;

void setup( )
{
  Serial.begin(9600);
  pinMode(13, OUTPUT);
}

void loop( )
{
  sensorValue = analogRead(sensorPin);
  Serial.println("Analog Value : ");
  Serial.println(sensorValue);
  if (sensorValue<limit)
  {
    digitalWrite(13, HIGH);
  }
  else{
    digitalWrite(13, LOW);
  }
  delay(1000);
}

Usage

  1. Agricultural science and horticulture
  2. Irrigation planning
  3. Climate research
  4. Solute transport studies
  5. Auxiliary sensors for soil respiration

Arduino Tutorials – Lesson 16 – Humidity Sensor Using Arduino UNO

Creating Humidity Sensor program using Arduino UNO

Required Components

  1. Humidity Sensor(DHT22) -1 no
  2. Arduino UNO -1 no
  3. Connecting wires -1 set

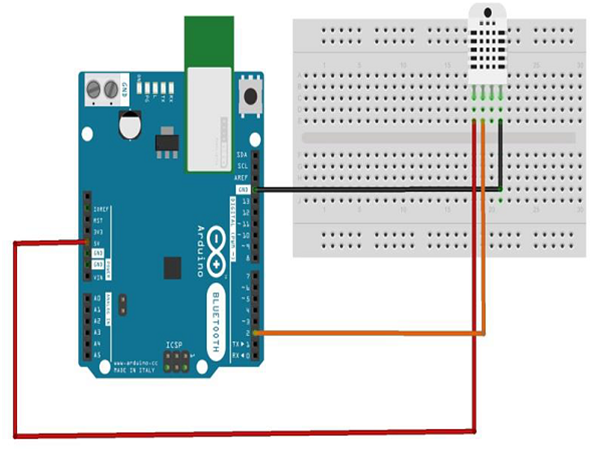
Circuit

Steps

  1. Make sure the components are working properly.
  2. Connect the Humidity Sensor to the Arduino UNO board.
  3. Connect the Arduino UNO board 2nd pin to the Humidity Sensor.
  4. Connect Humidity Sensor board VCC, GND to 5V, GND of Arduino Uno Board.
  5. Check the Cicuit Connections.
  6. Check the Arduino program.
  7. Run the Arduino program.

Arduino Program

#include "DHT.h"
#define DHTPIN 2
#define DHTTYPE DHT22
DHT dht(DHTPIN, DHTTYPE);

void setup() 
{
  Serial.begin(9600);
  Serial.println("DHTxx test!");
  dht.begin();
}

void loop( )
{
  delay(2000);
  float h = dht.readHumidity();
  float t = dht.readTemperature();
  float f = dht.readTemperature(true);
  if (isnan(h) || isnan(t) || isnan(f)) 
  {
    Serial.println("Failed to read from DHT sensor!");
    return;
  }
  float hif = dht.computeHeatIndex(f, h);
  float hic = dht.computeHeatIndex(t, h, false);
  Serial.print ("Humidity: ");
  Serial.print (h);
  Serial.print (" %\t");
  Serial.print ("Temperature: ");
  Serial.print (t);
  Serial.print (" *C ");
  Serial.print (f);
  Serial.print (" *F\t");
  Serial.print ("Heat index: ");
  Serial.print (hic);
  Serial.print (" *C ");
  Serial.print (hif);
  Serial.println (" *F");
}

Usage

  1. Industrial process &control systems
  2. Office automation
  3. Clothes dryer
  4. Microwave ovens
  5. Printers

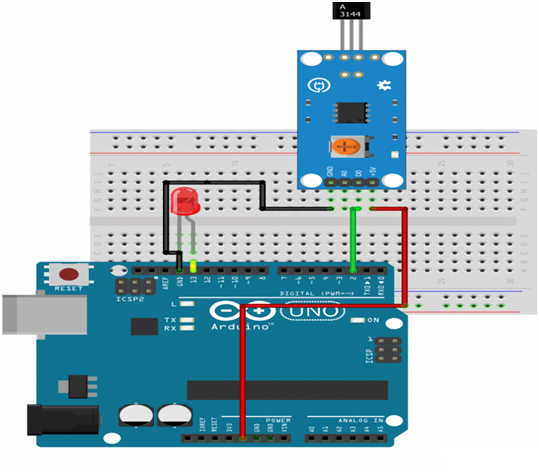
Arduino Tutorials – Lesson 15 -Hall Effect Sensor with Arduino UNO

Creating Hall Effect Sensor program using Arduino UNO

Required Components

  1. Hall effect sensor -1 no
  2. magnets -1 no
  3. Arduino UNO -1 no
  4. Connecting wires -1 set

Circuit

Steps

  1. Make sure the components are working properly.
  2. Connect the Hall effect Sensor to the Arduino UNO board.
  3. Connect the Arduino UNO board 2nd pin to the Hall effect Sensor(Analog or Digital).
  4. Connect Hall effect Sensor board VCC, GND to 5V, GND of Arduino Uno Board.
  5. Check the Cicuit Connections.
  6. Check the Arduino program.
  7. Run the Arduino program.

Arduino Program

int hallSensorPin = 2;
int ledPin =  13;
int state = 0;

void setup() 
{
  pinMode(ledPin, OUTPUT);
  pinMode(hallSensorPin, INPUT);
}

void loop( )
{
  state = digitalRead(hallSensorPin);
  if (state == LOW) 
  {
    digitalWrite(ledPin, HIGH);
  }
  else 
  {
    digitalWrite(ledPin, LOW);
  }
}

Usage

  1. Positioning
  2. Speed detection
  3. Current sensing applications
  4. Tachometers
  5. Anti-lock braking systems

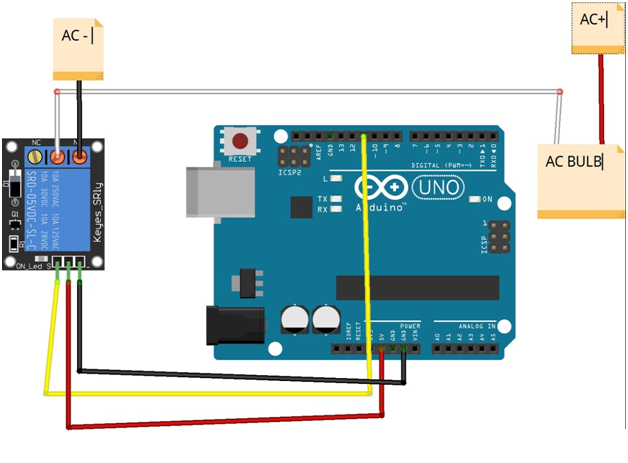
Arduino Tutorials – Lesson 14 – Relay Module Using Arduino UNO

Creating relay module test program using Arduino UNO

Required Components

  1. Arduino UNO -1 no
  2. 5V Relay -1 no
  3. Data Cable -1 no
  4. Connecting Wires -4 no

Circuit

Steps

  1. Make sure the components are working properly.
  2. Connect the Relay VCC, GND to the Arduino UNO board 5V, GND properly.
  3. Connect IN pin to Arduino UNO board pin 8.
  4. Check the Arduino program.
  5. Check the Circuit Connections.
  6. Run the Arduino program.

Arduino Program

int relayPin = 8;

void setup( )
{
  pinMode (relayPin, OUTPUT);
}

void loop( )
{
  digitalWrite (relayPin, HIGH);
  delay(2000);
  digitalWrite (relayPin, LOW);
  delay(1000);
}

Usage

  1. Used for signaling and control in railway networks.
  2. Used in electronic circuits and home appliances
  3. In motor control circuits for motor switching, protection as well as control.

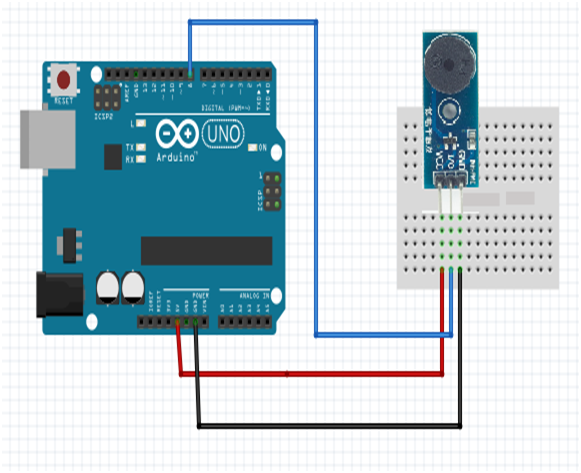
Arduino Tutorials – Lesson 13 – Buzzer Module Using Arduino UNO

Creating Buzzer control program using Arduino UNO

Required Components

  1. Buzzer module -1
  2. Arduino UNO -1
  3. Connecting wires -1 set

Circuit

Steps

  1. Make sure the components are working properly.
  2. Connect the Buzzer to the Arduino UNO board.
  3. Connect the Arduino UNO board 8th pin to the Buzzer.
  4. Connect Buzzer board VCC, GND to 5V, GND of Arduino Uno Board.
  5. Check the Cicuit Connections.
  6. Check the Arduino program.
  7. Run the Arduino program.

Arduino Program

const int buzzer = 8;

void setup( )
{
  pinMode(buzzer, OUTPUT);
}

void loop()
{
  tone(buzzer, 1000);
  delay(1000);
  noTone(buzzer);
  delay(1000);        
}

Usage

  1. Alarm clock
  2. Wrist watches
  3. Microwave oven
  4. Fire alarms
  5. Medical devices

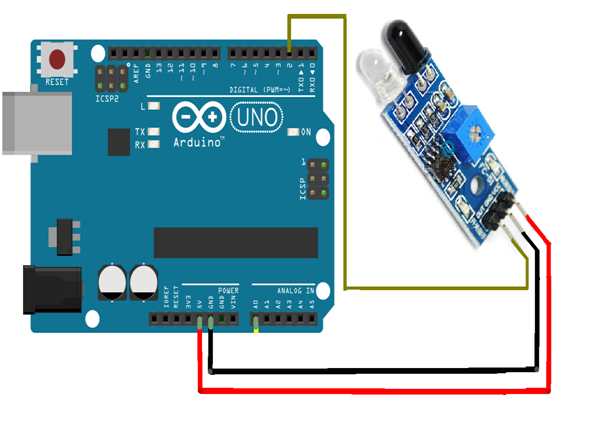
Arduino Tutorials – Lesson 12 – IR Sensor control Using Arduino UNO

Creating IR Sensor program using Arduino UNO

Required Components

  1. Infrared sensor-1
  2. Arduino board -1
  3. Connecting cables -1 set

Circuit

Steps

  1. Make sure the components are working properly.
  2. Connect the IR Sensor to the Arduino UNO board.
  3. Connect the Arduino UNO board 2nd pin to the IR Sensor.
  4. Connect IR Sensor board VCC, GND to 5V, GND of Arduino Uno Board.
  5. Check the Cicuit Connections.
  6. Check the Arduino program.
  7. Run the Arduino program.

Arduino Program

int IRPin = 2;
int ledPin=13;
int value;

void setup(  )
{
  pinMode (ledPin,OUTPUT);
  pinMode(IRPin, INPUT);
  Serial.begin(9600);
}
void loop(  )
{
  if (digitalRead (IRPin)==HIGH)
  {
    digitalWrite(ledPin,HIGH);
    Serial.print("Sensor is detect,LED is on");
    delay(100);
  }
  else
  {
    digitalWrite(ledPin,LOW);
    Serial.print("signal is cut,LED is off");
    delay(100);
  }
  value = digitalRead(IRPin);
  Serial.println(value);
}

Usage

  1. Flame Monitors
  2. Radiation Thermometers
  3. Moisture Analyzer
  4. Gas Analyzers
  5. IR Imaging Devices

Arduino Tutorials – Lesson 11 – DC motor control by Ultrasonic Sensor Using Arduino UNO

Creating DC motor control by Ultrasonic Sensor program using Arduino UNO

Required Components

  1. Ultrasonic sensor board -1 no
  2. Arduino Uno board -1 no
  3. DC Motor -1 no
  4. 12V Battery -1 no
  5. Data Cable -1 no
  6. Connecting Wires -8 no
  7. DC motor driver(L298N) -1 no

Circuit

Steps

  1. Make sure the components are working properly.
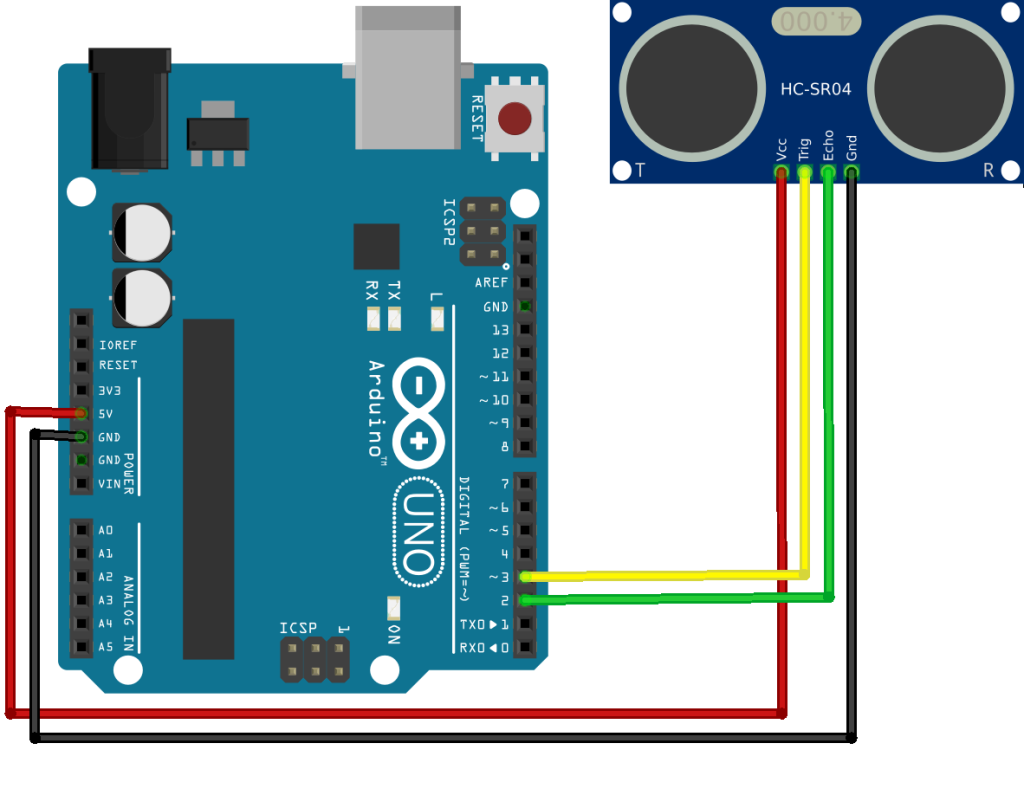
  2. Ultrasonic Sensor board VCC, GND connected to 5V, GND of Arduino Uno Board.
  3. Connect Ultrasonic sensor Board echo, trigger pin to the Arduino Uno Board 2, 3 pin.
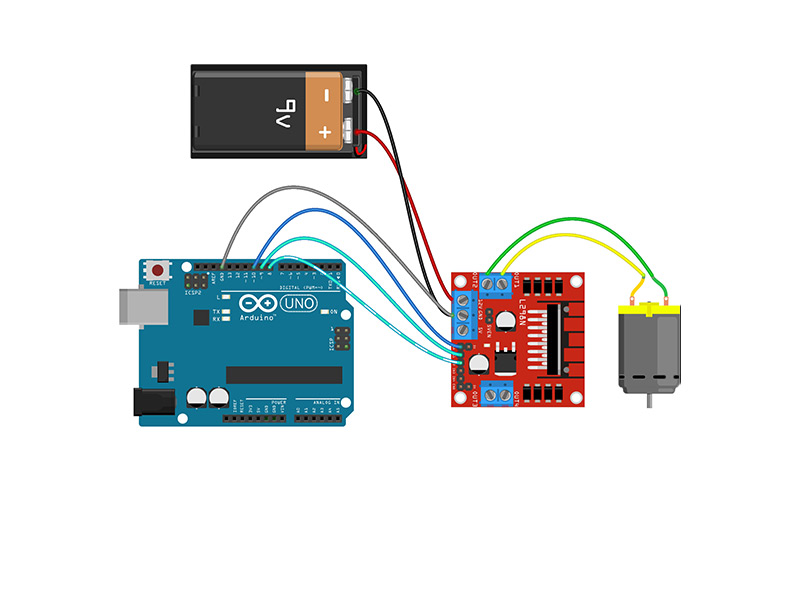
  4. Connect the ENA, IN1, IN2 pins to the Arduino Uno board pins 10, 8, 9 properly.
  5. Connect DC motor pins to DC motor driver output pins.
  6. Connect 12V battery to DC motor driver.
  7. Check the Arduino program.
  8. Check the Circuit Connections.
  9. Run the Arduino program.

Arduino Program

#define echopin 2
#define trigpin 3
long duration;
int distance;
int motorpin1 = 8;
int motorpin2 = 9;
int enpin1 = 10;

void setup()
{
  pinMode(trigpin, OUTPUT);
  pinMode(echopin, INPUT);
  Serial.begin(9600);
  Serial.println("Ultrasonic Sensor HC-SR04 Test");
  Serial.println("with Arduino UNO R3");
  pinMode(motorpin1, OUTPUT);
  pinMode(motorpin2, OUTPUT);
  pinMode(enpin1, OUTPUT);
  analogWrite(enpin1,70);
}

void loop() 
{
  digitalWrite(trigpin,LOW);
  delay(2000);
  digitalWrite(trigpin,HIGH);
  delay(5000);
  digitalWrite(trigpin,LOW);
  
  duration = pulseIn(echopin,HIGH);
  distance = duration * 0.034 / 2;
  Serial.print("Distance: ");
  Serial.print(distance);
  Serial.println(" cm");
  
  if(distance > 20)
  {
    forward();
    delay(1000);
  }
  else if(distance <= 20)
  {
    stop();
    delay(1000);
  }
}

void stop ()
{
  digitalWrite(motorpin1,LOW);
  digitalWrite(motorpin2,LOW);
}

void forward()
{
  digitalWrite(motorpin1,HIGH);
  digitalWrite(motorpin2,LOW);
}

Usage

  1. Robot vehicles
  2. Defence vehicle

Projects

  1. Ball picking robot

Arduino Tutorials – Lesson 10 – DC Motor Control Using Arduino UNO

Creating DC Motor Control program using Arduino UNO

Required Components

  1. DC motor -1 no
  2. L293D Driver sheild -1 no
  3. Arduino UNO -1 no
  4. Bread board -1 no
  5. Connecting wires -1 set

Circuit

Steps

  1. Make sure the components are working properly.
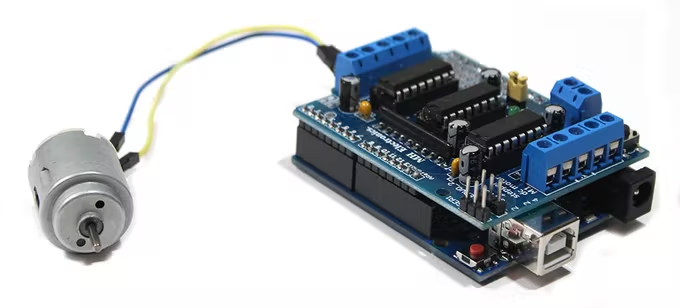
  2. Connect the Motor Driver Shield to the Arduino UNO Board.
  3. Connect the DC motor to the Shield Pin 3.
  4. Connect the 9V Battery to the L293D Motor Driver carefully.
  5. Check the Circuit Connections.
  6. Check the Arduino program.
  7. Run the Arduino program

Arduino Program

#include <AFMotor.h>
AF_DCMotor motor1(3);

void setup() 
{
  motor1.setSpeed(200);
  motor1.run(RELEASE);
}

void loop()
{
  motor1.run(FORWARD);
  motor1.setSpeed(255);
  delay(1000);
  motor1.run(BACKWARD);
  motor1.setSpeed(255);
  delay(1000);
}

Usage

  1. Moving wheel Robot
  2. Rotating Robot Arms
  3. For pump related applications