Ball collecting robot is a mobile controlled wheeled robot which can be used to collect balls in a playing area. This is a prototype project which will be useful to learn about mobile robots. This concept can be extended to build fully functional ball collecting robot.
Component Required
- Arduino Nano
- Bluetooth
- 12V DC Motors (2)
- Dc Motor Driver
- 12V battery
- Servo Motor
- Cables & Wires
- Robot Wheels
- Robot Gripper
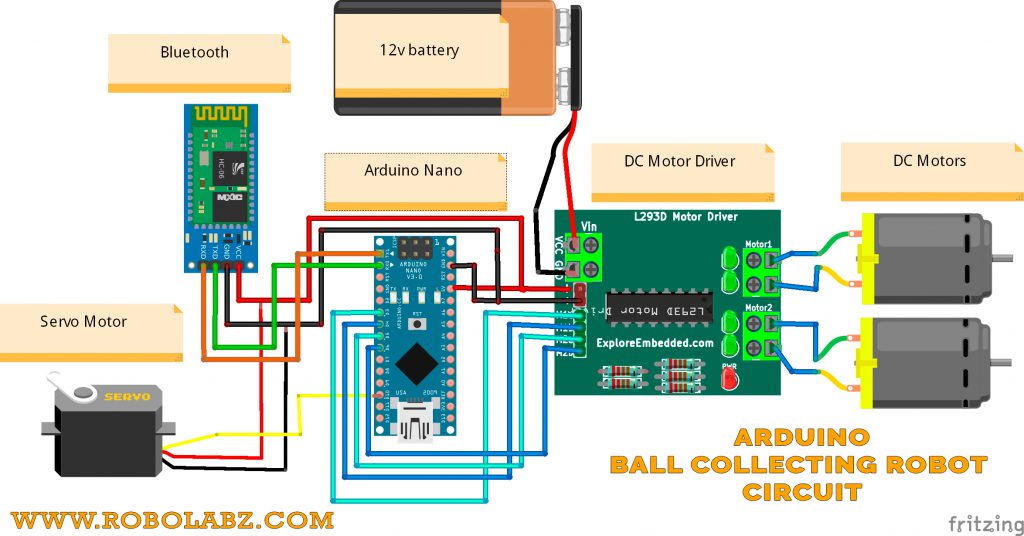
Circuit Diagram
Steps
1 :Connect the DC Motors with DC Motor Drive
2: Connect the DC motor drive OUTPUT Pins with Arduino Nano Pins
   Drive Pins                Arduino Nano

      1A                        D3
      1B                        D4
      2A                        D5
      2B                        D6
3: Connect the Servo Motor with Arduino Nano
      wires                  Pins

       Red                    5V
       Black                  GND
       Yellow                 D10
4 : Connect the Bluetooth with Arduino Nano
  Bluetooth               Arduino Nano

   5V                          5V
   GND                         GND
   RX                          TX
   TX                          RX
5 : Check the Connection once
6 : Upload the arduino program
7 : Install the mobile application in the mobile device.
8: Test the robot with mobile application
Arduino Program
#include <AFMotor.h>
#include <Servo.h>
// Check the motor driver datasheet for motor pin connections
AF_DCMotor rm(1, MOTOR12_64KHZ);  // Right motor
AF_DCMotor lm(4, MOTOR34_64KHZ);  // Left motor
Servo grServo; // Servo motor for gripper
byte incomingByte ;

void setup()
{
   Serial.begin(9600);
  // Set motors speed
   rm.setSpeed(200);
   lm.setSpeed(200);
   rm.run(RELEASE);
   lm.run(RELEASE);
	grServo.attach(10); // Attach gripper
}
void loop()
{
   if (Serial.available() > 0) {
    incomingByte = Serial.read(); // Read the input character from bluetooth serial input buffer

    if (incomingByte == 'A')
    {
         grServo.write(120);      // Gripper Open Position
    }
    else if (incomingByte =='B')
    {
        grServo.write(180);      // Gripper Close Position
    }
    else if (incomingByte == 'C')
    {
        rm.run(FORWARD);        // Run both motors in forward direction
        lm.run(FORWARD);
    }
    else if (incomingByte == 'D')
    {
        rm.run(BACKWARD);       // Run both motors in backward direction
        lm.run(BACKWARD);
    }
    else if (incomingByte == 'E')
    {
        rm.run(BACKWARD);       // Turning Left. Run right motor in backward direction and left motor in forward direction
        lm.run(FORWARD);
    }
    else if (incomingByte == 'G')
    {
        rm.run(FORWARD);        // Turning Right. Run right motor in forward direction and left motor in backward direction
        lm.run(BACKWARD);
    }
    else if (incomingByte == 'F')
    {
        rm.run(RELEASE);        // Stop both motors
        lm.run(RELEASE);
    }
   }
   delay(20);
}
Get the motor driver library from https://github.com/adafruit/Adafruit-Motor-Shield-library
Get the code from github : https://github.com/robolabz/ballcollectingrobot
For robot base and gripper design files and mobile application, contact “info at robolabz.com”