Python Tutorials – பாடம் 12 – L298N Motor Driver Module using Raspberry Pi Pico
L298N Motor Driver ஐ பயன்படுத்தி 1 DC மோட்டாரை கட்டுப்படுத்துவது
Required Components
L298N Motor Driver Module-1 no
Raspberry Pi Pico-1 no
DC Motor(gear)-2 no
12V Battery-1 no
Data Cable-1 no
Connecting Wires-4 no
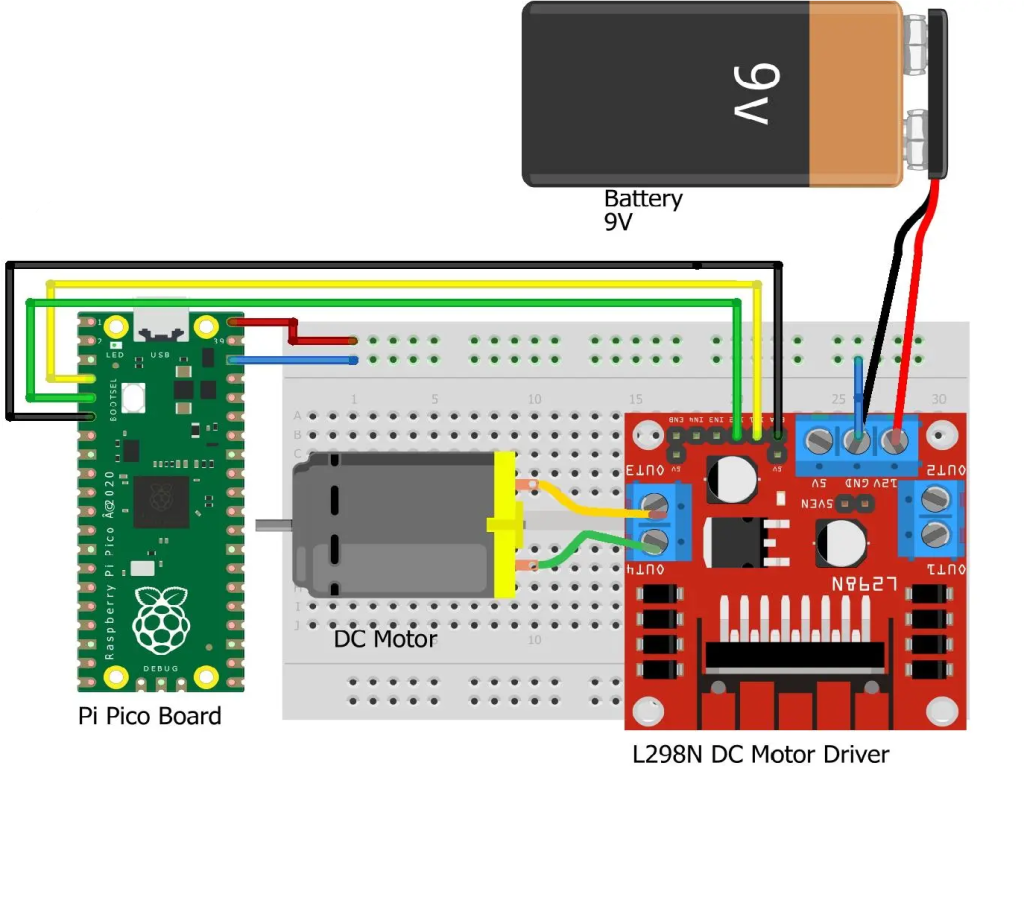
Circuit
Steps
நாம் பயன்படுத்தும் உபகரணங்கள் சரியாக வேலை செய்கிறதா என்பதை உறுதி செய்து கொள்ளவும்.
மோட்டார் Driver போர்டு உடன் +12V battery இணைக்க வேண்டும்.
+12V பேட்டரி இணைப்புகளை சரியாகவும் கவனமாகவும் இணைக்க வேண்டும்.
மோட்டார் Driver போர்டு ENA, IN1, IN2 பின்களை Raspberry Pi Pico பின்களான GP4, GP2, GP3 உடன் இணைக்க வேண்டும்.
மோட்டார் Driver போர்டு OUTPUT பின்களை DC மோட்டார் பின்களுடன் இணைக்க வேண்டும்.
மோட்டார் Driver போர்டு GND ஐ Raspberry Pi Pico GND உடன் இணைக்க வேண்டும்.
Python program ஐ சரி பார்க்க வேண்டும்.
மின்சுற்றை சரி பார்க்க வேண்டும்.
Python program ஐ ரன் செய்ய வேண்டும்.
Python Program
from machine import Pin
import utime

m1 = Pin(2, Pin.OUT)
m2 = Pin(3, Pin.OUT)

en1 = Pin(4, Pin.OUT)

en1(1)  # motor 1 enable, set value 0 to disable

while True:
    #Both Motor in forward direction
    m1(1)
    m2(0)
    utime.sleep(1)
    #Both Motor in Reverse direction
    m1(0)
    m2(1)
    utime.sleep(1)
    #Both Motor in stop position
    m1(0)
    m2(0)
    utime.sleep(5)