Creating Humidity Sensor program using Arduino UNO
Required Components
- Humidity Sensor(DHT22) -1 no
- Arduino UNO -1 no
- Connecting wires -1 set
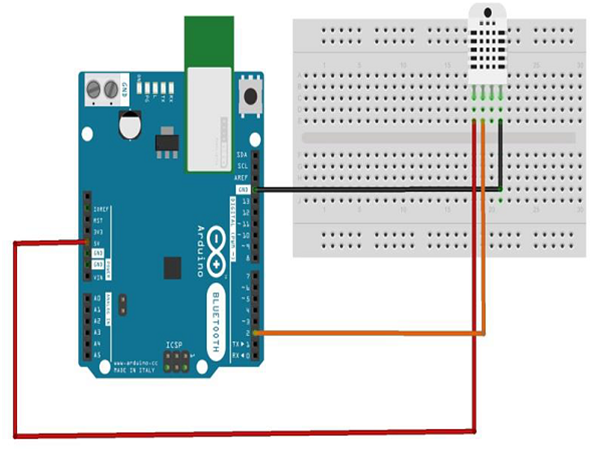
Circuit
Steps
- Make sure the components are working properly.
- Connect the Humidity Sensor to the Arduino UNO board.
- Connect the Arduino UNO board 2nd pin to the Humidity Sensor.
- Connect Humidity Sensor board VCC, GND to 5V, GND of Arduino Uno Board.
- Check the Cicuit Connections.
- Check the Arduino program.
- Run the Arduino program.
Arduino Program
#include "DHT.h"
#define DHTPIN 2
#define DHTTYPE DHT22
DHT dht(DHTPIN, DHTTYPE);

void setup()
{
  Serial.begin(9600);
  Serial.println("DHTxx test!");
  dht.begin();
}

void loop( )
{
  delay(2000);
  float h = dht.readHumidity();
  float t = dht.readTemperature();
  float f = dht.readTemperature(true);
  if (isnan(h) || isnan(t) || isnan(f))
  {
    Serial.println("Failed to read from DHT sensor!");
    return;
  }
  float hif = dht.computeHeatIndex(f, h);
  float hic = dht.computeHeatIndex(t, h, false);
  Serial.print ("Humidity: ");
  Serial.print (h);
  Serial.print (" %\t");
  Serial.print ("Temperature: ");
  Serial.print (t);
  Serial.print (" *C ");
  Serial.print (f);
  Serial.print (" *F\t");
  Serial.print ("Heat index: ");
  Serial.print (hic);
  Serial.print (" *C ");
  Serial.print (hif);
  Serial.println (" *F");
}
Usage
- Industrial process &control systems
- Office automation
- Clothes dryer
- Microwave ovens
- Printers