Arduino Tutorials – பாடம் 29 – Servo motor control by Ultrasonic Sensor Module using Arduino UNO

Ultrasonic sensor உடன் இணைக்கப்பட்ட Servo மோட்டாரை Arduino UNO உதவியுடன் கட்டுப்படுத்துவது.

Required Components

  1. Ultrasonic sensor board -1 no
  2. Arduino Uno board -1 no
  3. Servo Motor -1 no
  4. Bread board -1 no
  5. Data Cable -1 no
  6. Connecting Wires -8 no
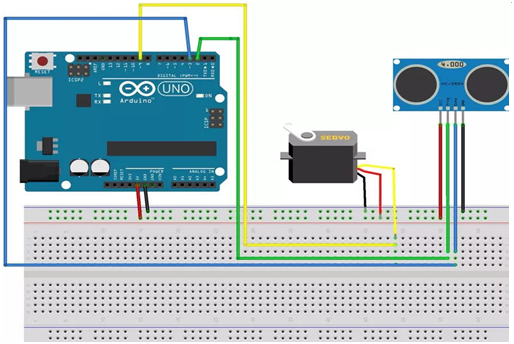
Circuit

Steps

  1. நாம் பயன்படுத்தும் உபகரணங்கள் சரியாக வேலை செய்கிறதா என்பதை உறுதி செய்து கொள்ளவும்.
  2. Ultrasonic sensorல் உள்ள echo மற்றும் trigger பின்களை Arduino வில் உள்ள 2 மற்றும் 3 பின்களுடன் இணைக்க வேண்டும்.
  3. Arduino Uno Boardன் +5V மற்றும் ground சப்ளையை servo மோட்டார் மற்றும் Ultrasonic sensor உடன் இணைக்க வேண்டும்.
  4. Servo மோட்டார் மற்றும் Ultrasonic Sensor ஐ Bread board உடன் இணைக்க வேண்டும்.
  5. Servo மோட்டார் டேட்டா பின்னை Arduino Uno Boardன் 5 வது pin உடன் இணைக்க வேண்டும்.
  6. Arduino program ஐ சரி பார்க்க வேண்டும்.
  7. மின்சுற்றை சரி பார்க்க வேண்டும்.
  8. Arduino program ஐ ரன் செய்ய வேண்டும்.

Arduino Program

#include <Servo.h>
Servo myservo;
#define echoPin 2 
#define trigPin 3 
long duration; 
int distance; 
void setup() 
{
  pinMode(trigPin, OUTPUT);
  pinMode(echoPin, INPUT);
  myservo.attach(5); 
  Serial.begin(9600);
  Serial.println("Ultrasonic Sensor HC-SR04 Test"); 
  Serial.println("with Arduino UNO R3");
  myservo.write(0);
}
void loop() 
{
  digitalWrite(trigPin, LOW);
  delayMicroseconds(2);
  digitalWrite(trigPin, HIGH);
  delayMicroseconds(10);
  digitalWrite(trigPin, LOW);
  duration = pulseIn(echoPin, HIGH);
  distance = duration * 0.034 / 2;  
  Serial.print("Distance: ");
  Serial.print(distance);
  Serial.println(" cm");
  
  if(distance<=40)
  {
    myservo.write(0);
  }
  else
  {
    myservo.write(160);
  }
}

Usage

  1. Robotic sensing.

Projects

  1. Sensor dustbin.

Arduino Tutorials – பாடம் 27 – Position Encoder sensor using Arduino MEGA2560

Arduino வை பயன்படுத்தி ஒரு position encoder sensorஐ அளவீடு செய்வது.

Required Components

  1. Position encoder sensor -1 no
  2. Arduino board Mega 2560 -1 no
  3. Connecting Wires -4 no

Circuit

Steps

  1. நாம் பயன்படுத்தும் உபகரணங்கள் சரியாக வேலை செய்கிறதா என்பதை உறுதி செய்து கொள்ளவும்.
  2. Position encoder sensorல் உள்ள CLK மற்றும் DT பின்களை Arduinoவில் உள்ள 6 மற்றும் 7 பின்களுடன் இணைக்க வேண்டும்.
  3. Arduino mega 2560 வின் +5V மற்றும் ground சப்ளையை Position encoder sensor உடன் Bread board வழியாக ஒயர்களை கொண்டு இணைக்க வேண்டும்.
  4. Arduino program ஐ சரி பார்க்க வேண்டும்.
  5. மின்சுற்றை சரி பார்க்க வேண்டும்.
  6. Arduino program ஐ ரன் செய்ய வேண்டும்.

Arduino Program

#define outputA 8
#define outputB 9
int counter = 0;
int aState;
int aLastState;

void setup() 
{
  pinMode (outputA,INPUT);
  pinMode (outputB,INPUT);
  Serial.begin (9600);
  aLastState = digitalRead(outputA);
}

void loop() 
{
  aState = digitalRead(outputA); // Reads the "current" state of the outputA
  if (aState != aLastState)
  {
    if (digitalRead(outputB) != aState) {
      counter ++;
    } 
    else {
      counter --;
    }
    Serial.print("Position: ");
    Serial.println(counter);
  }
  aLastState = aState;
}

Usage

  1. தன்னியக்கம் (Automation).
  2. விண்வெளி (Aerospace).
  3. துணியகம் (Textiles).

Arduino Tutorials – பாடம் 1 – Single LED Blink Using Arduino UNO

Arduino வை பயன்படுத்தி ஒரு LED ஐ ஒளிர வைப்பது

Required Components

  1. Led – 1 no
  2. Resister 220Ω – 1 no
  3. Arduino UNO board – 1 no
  4. Connecting wires – 1 no

Circuit

Steps

  1. நாம் பயன்படுத்தும் உபகரணங்கள் சரியாக வேலை செய்கிறதா என்பதை உறுதி செய்து கொள்ளவும்.
  2. 220 Ω மின்தடையை LED உடன் இணைக்க வேண்டும்.
  3. LED இன் அடுத்த இணைப்பை ground உடன் இணைக்க வேண்டும்.
  4. Arduino program ஐ சரி பார்க்க வேண்டும்.
  5. மின்சுற்றை சரி பார்க்க வேண்டும்.
  6. Arduino program ஐ ரன் செய்ய வேண்டும்.

Arduino Program

int led1 = 13;

void setup ( )
{
  pinMode (led1, OUTPUT);
}

void loop ( )
{
  digitalWrite (led1, HIGH);
  delay (3000);
  digitalWrite (led1, LOW);
  delay (1000);
}

Usage

  1. தொலைக்காட்சி பின்னொளி (TV backlighting).
  2. திறன்பேசி பின்னொளி (Smartphone lights).
  3. வாகன விளக்குகள் (Automotive lights).
  4. LED காட்சிமுறை (LED Display).