To control up to 2 DC motors with directional and speed control
Required Components
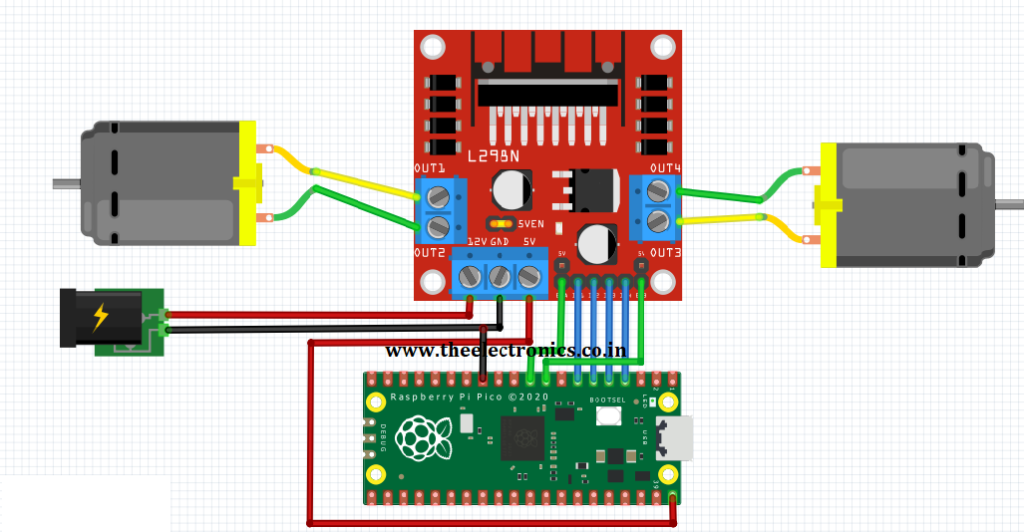
- L298N Motor Driver Module_1 no
- Raspberry Pi Pico_1 no
- DC Motor(gear)_2 no
- 12V Battery_1 no
- Data Cable_1 no
- Connecting Wires_4 no
Circuit
Steps
- Make sure the components are working properly.
- Connect the 12V Battery to the L298N Motor Driver.
- Connect the ENA, IN1, IN2, IN3, IN4, ENB pins to the Raspberry Pi Pico board pins GP7, GP5, GP4, GP3, GP2, GP6 properly.
- Connect the DC motor pins to the motor driver output pins.
- Connect the ground connection respectively.
- Check the Electrical Circuit.
- Check the Arduino program.
- Run the Arduino program.
Arduino Program
int motor1pin1 = 2;
int motor1pin2 = 3;
int enPin1 = 4;

int motor2pin1 = 5;
int motor2pin2 = 6;
int enPin2 = 7;


void setup()
 {
  pinMode(motor1pin1, OUTPUT);
  pinMode(motor1pin2, OUTPUT);
  pinMode(enPin1, OUTPUT);
  digitalWrite(enPin1, HIGH);

  pinMode(motor2pin1, OUTPUT);
  pinMode(motor2pin2, OUTPUT);
  pinMode(enPin2, OUTPUT);
  digitalWrite(enPin2, HIGH);

}

void loop()
{
  digitalWrite(motor1pin1, HIGH);
  digitalWrite(motor1pin2, LOW);
  digitalWrite(motor2pin1, HIGH);
  digitalWrite(motor2pin2, LOW);
  delay(1000);

  digitalWrite(motor1pin1, LOW);
  digitalWrite(motor1pin2, HIGH);
  digitalWrite(motor2pin1, LOW);
  digitalWrite(motor2pin2, HIGH);
  delay(1000);
}
