L298N Motor Driver ஐ பயன்படுத்தி 2 DC மோட்டார்களை கட்டுப்படுத்துவது
Required Components
L298N Motor Driver Module-1 no
Raspberry Pi Pico-1 no
DC Motor(gear)-2 no
12V Battery-1 no
Data Cable-1 no
Connecting Wires-4 no
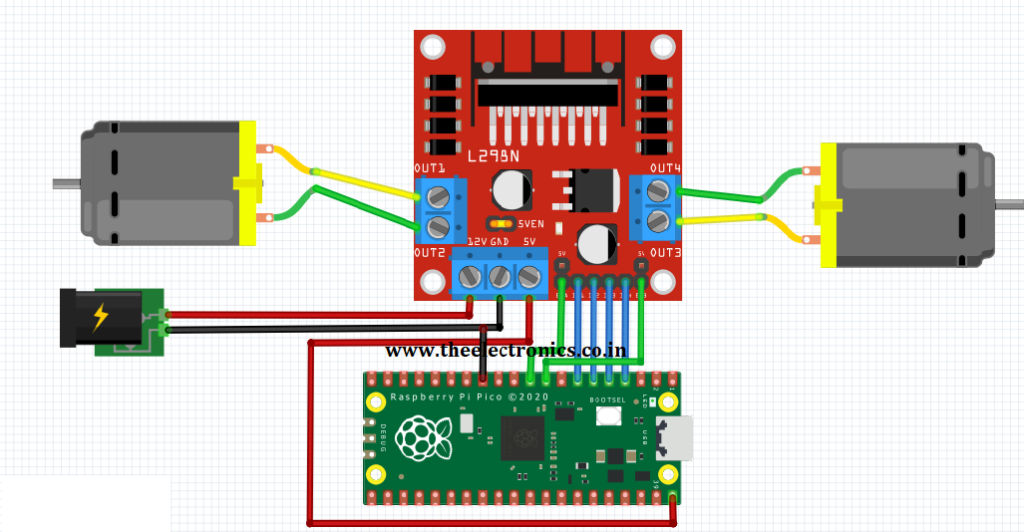
Circuit
Steps
நாம் பயன்படுத்தும் உபகரணங்கள் சரியாக வேலை செய்கிறதா என்பதை உறுதி செய்து கொள்ளவும்.
மோட்டார் Driver போர்டு உடன் +12V battery இணைக்க வேண்டும்.
+12V பேட்டரி இணைப்புகளை சரியாகவும் கவனமாகவும் இணைக்க வேண்டும்.
மோட்டார் Driver போர்டு ENA, IN1, IN2, IN3, IN4, ENB பின்களை Raspberry Pi Pico பின்களான GP6, GP5, GP4, GP3, GP2, GP7 உடன் இணைக்க வேண்டும்.
மோட்டார் Driver போர்டு OUTPUT பின்களை DC மோட்டார் பின்களுடன் இணைக்க வேண்டும்.
மோட்டார் Driver போர்டு GND ஐ Raspberry Pi Pico board GND உடன் இணைக்க வேண்டும்.
Python program ஐ சரி பார்க்க வேண்டும்.
மின்சுற்றை சரி பார்க்க வேண்டும்.
Python program ஐ ரன் செய்ய வேண்டும்.
Python Program
from machine import Pin
import utime

m1 = Pin(5, Pin.OUT)
m2 = Pin(4, Pin.OUT)
m3 = Pin(3, Pin.OUT)
m4 = Pin(2, Pin.OUT)

en1 = Pin(6, Pin.OUT)
en2 = Pin(7, Pin.OUT)

en1(1)  # motor 1 enable, set value 0 to disable
en2(1)  # motor 2 enable, set value 0 to disable

while True:
    #Both Motor in forward direction
    m1(1)
    m2(0)
    m3(1)
    m4(0)
    utime.sleep(1)
    #Both Motor in Reverse direction
    m1(0)
    m2(1)
    m3(0)
    m4(1)
    utime.sleep(1)
    #Both Motor in stop position
    m1(0)
    m2(0)
    m3(0)
    m4(0)
    utime.sleep(5)
To control 2 DC motors with directional and speed control
Required Components
L298N Motor Driver Module_1 no
Raspberry Pi Pico_1 no
DC Motor(gear)_2 no
12V Battery_1 no
Data Cable_1 no
Connecting Wires_4 no
Circuit
Steps
Make sure the components are working properly.
Connect the 12V Battery to the L298N Motor Driver.
Connect the ENA, IN1, IN2, IN3, IN4, ENB pins to the Raspberry Pi Pico board pins GP7, GP5, GP4, GP3, GP2, GP6 properly.
Connect the DC motor pins to the motor driver output pins.
Connect the ground connection respectively.
Check the Electrical Circuit.
Check the Python program.
Run the Python program.
Python Program
from machine import Pin
import utime

m1 = Pin(5, Pin.OUT)
m2 = Pin(4, Pin.OUT)
m3 = Pin(3, Pin.OUT)
m4 = Pin(2, Pin.OUT)

en1 = Pin(6, Pin.OUT)
en2 = Pin(7, Pin.OUT)

en1(1)  # motor 1 enable, set value 0 to disable
en2(1)  # motor 2 enable, set value 0 to disable

while True:
    #Both Motor in forward direction
    m1(1)
    m2(0)
    m3(1)
    m4(0)
    utime.sleep(1)
    #Both Motor in Reverse direction
    m1(0)
    m2(1)
    m3(0)
    m4(1)
    utime.sleep(1)
    #Both Motor in stop position
    m1(0)
    m2(0)
    m3(0)
    m4(0)
    utime.sleep(5)