Creating the reflected color when the light sensor shining a white light at an object program using Arduino UNO
Required Components
- Arduino UNO -1 no
- Color Sensor -1 no
- USB cable -1 no
- Jumper Wires -7 no
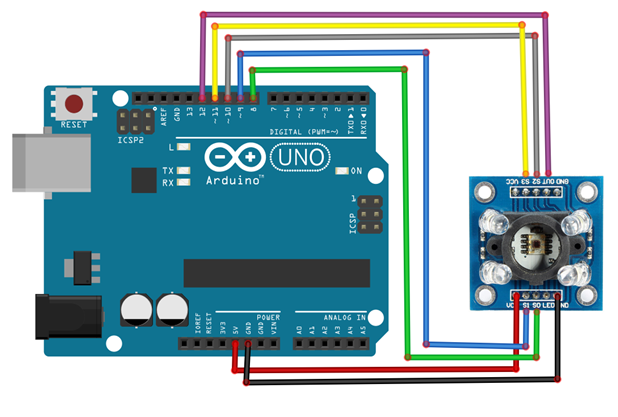
Circuit
Steps
- Make sure the components are working properly.
- Connect the Color Sensor S0, S1, S2, S3 &Out pins to the Arduino UNO board pins 4,5,6,7 &8 respectively.
- Connect the sensor vcc pin to the Arduino UNO 5V pin.
- Connect the ground connection respectively.
- Check the Arduino program.
- Check the Circuit Connections.
- Run the Arduino program.
Arduino Program
#define s0 4
#define s1 5
#define s2 6
#define s3 7
#define out 8
int data=0;

void setup()
{
  pinMode(s0,OUTPUT);
  pinMode(s1,OUTPUT);
  pinMode(s2,OUTPUT);
  pinMode(s3,OUTPUT);
  pinMode(out,INPUT);
  Serial.begin(9600);
  digitalWrite(s0,HIGH);
  digitalWrite(s1,HIGH);
}

void loop()
{
  digitalWrite(s2,HIGH);
  digitalWrite(s3,HIGH);
  Serial.print("Red value= ");
  GetData();
  digitalWrite(s2,LOW);
  digitalWrite(s3,HIGH);
  Serial.print("Blue value= ");
  GetData();
  digitalWrite(s2,LOW);
  digitalWrite(s3,LOW);
  Serial.print("Green value= ");
  GetData();
  Serial.println();
  delay(500);
}

void GetData()
{
  data=pulseIn(out,LOW);
  Serial.print(data
  Serial.print("\t");
  delay(20);
}
Usage
- Color
temperature measurement
- RGB
LED consistency control
- Medical
diagnosis systems
- Health
fitness systems
- Industrial
process control