Colour Sensor ஐ Arduino UNO வை கொண்டு கட்டுப்படுத்துவது.
Required Components
- Arduino UNO -1 no
- Color Sensor -1 no
- USB cable -1 no
- Jumper Wires -7 no
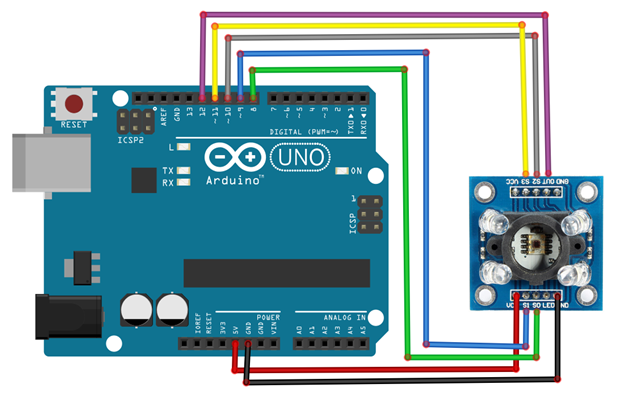
Circuit
Steps
- நாம் பயன்படுத்தும் உபகரணங்கள் சரியாக வேலை செய்கிறதா என்பதை உறுதி செய்து கொள்ளவும்.
- Colour detector ஐ Arduino UNO உடன் இணைக்க வேண்டும்.
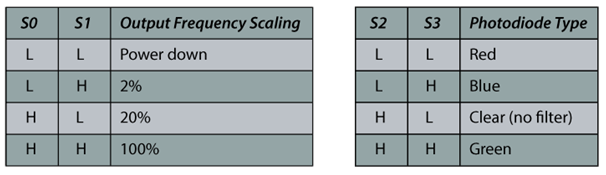
- Arduino UNO பின்னான 4 மற்றும் 5 ஐ Colour detector S0 மற்றும் S1 உடன் இணைக்க வேண்டும்.
- Arduino UNO பின்னான 6 மற்றும் 7 ஐ Colour detector S2 மற்றும் S3 உடன் இணைக்க வேண்டும்.
- Colour detector உடன் +5V மற்றும் Ground ஐ இணைக்க வேண்டும்.
- Arduino program ஐ சரி பார்க்க வேண்டும்.
- மின்சுற்றை சரி பார்க்க வேண்டும்.
- Arduino program ஐ ரன் செய்ய வேண்டும்.
Arduino Program
#define s0 4
#define s1 5
#define s2 6
#define s3 7
#define out 8
int data=0;

void setup()
{
  pinMode(s0,OUTPUT);
  pinMode(s1,OUTPUT);
  pinMode(s2,OUTPUT);
  pinMode(s3,OUTPUT);
  pinMode(out,INPUT);
  Serial.begin(9600);
  digitalWrite(s0,HIGH);
  digitalWrite(s1,HIGH);
}

void loop()
{
  digitalWrite(s2,HIGH);
  digitalWrite(s3,HIGH);
  Serial.print("Red value= ");
  GetData();
  digitalWrite(s2,LOW);
  digitalWrite(s3,HIGH);
  Serial.print("Blue value= ");
  GetData();
  digitalWrite(s2,LOW);
  digitalWrite(s3,LOW);
  Serial.print("Green value= ");
  GetData();
  Serial.println();
  delay(500);
}

void GetData()
{
  data=pulseIn(out,LOW);
  Serial.print(data
  Serial.print("\t");
  delay(20);
}
Usage
- வண்ணம் கண்டறிதல்(Colour Detection)
- வீடியோ செயலாக்கம்(video processing)
- படிம வருடி(image
scanning technique)
- வருடுதல்(Scanner)
- அச்சுப்பொறி நுட்பம்(printer)