Ultrasonic sensor distance ஐ OLED டிஸ்ப்ளேயில் பெறுதல்
Required Components
- OLED Display-1 no
- Raspberry Pi Pico board-1 no
- Ultrasonic Sensor-1 no
- USB Cable-1 no
- Connecting wires-1 set
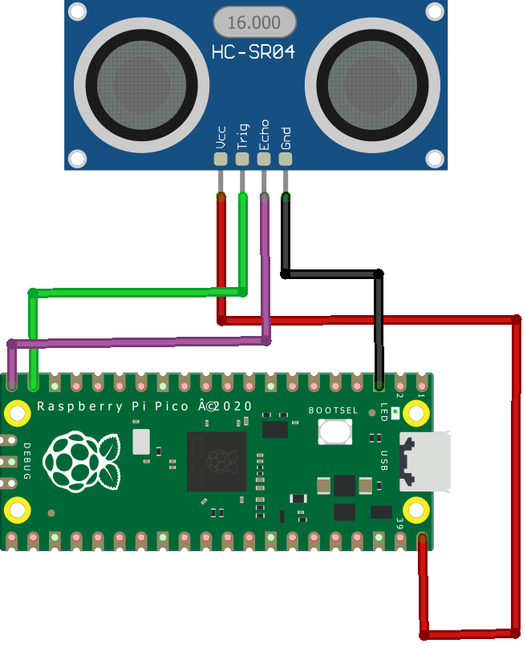
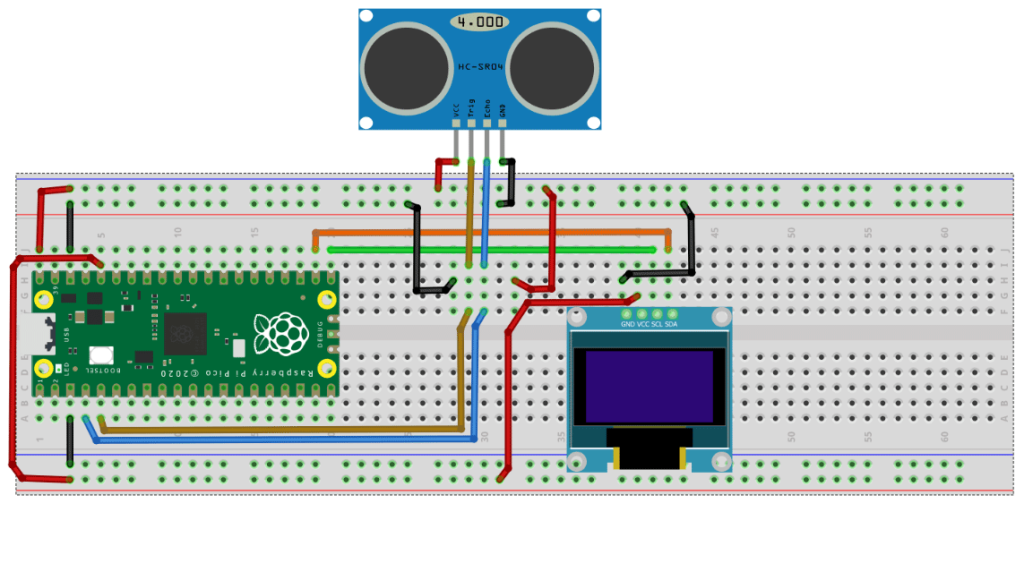
Circuit
Steps
- நாம் பயன்படுத்தும் உபகரணங்கள் சரியாக வேலை செய்கிறதா என்பதை உறுதி செய்து கொள்ளவும்.
- Ultrasonic Sensor VCC மற்றும் Gnd சப்ளையை Raspberry Pi Pico VBus மற்றும் GND உடன் இணைக்க வேண்டும்.
- Ultrasonic sensorல் உள்ள ECHO மற்றும் TRIG பின்களை Raspberry Pi Pico வில் உள்ள GP2 மற்றும் GP3 பின்களுடன் இணைக்க வேண்டும்.
- OLED Display VCC, GND ஐ Raspberry Pi Pico Board 3V3 (OUT), GND உடன் இணைக்க வேண்டும்.
- Raspberry Pi Pico Board இன் GP16, GP17 ஐ OLED Display SCK, SDA உடன் இணைக்க வேண்டும்.
- Python program ஐ சரி பார்க்க வேண்டும்.
- மின்சுற்றை சரி பார்க்க வேண்டும்.
- Python program ஐ ரன் செய்ய வேண்டும்.
Python Program
from machine import Pin, I2C
from ssd1306 import SSD1306_I2C
import utime
trigger = Pin(3, Pin.OUT)
echo = Pin(2, Pin.IN)
def ultrasonnic():
    timepassed=0
    trigger.low()
    utime.sleep_us(2)
    trigger.high()
    utime.sleep_us(5)
    trigger.low()
    while echo.value() == 0:
        signaloff = utime.ticks_us()
    while echo.value() == 1:
        signalon = utime.ticks_us()
    timepassed = signalon - signaloff
    return timepassed
WIDTH  = 128                                            # oled display width
HEIGHT = 64                                            # oled display height
i2c = I2C(0, scl=Pin(17), sda=Pin(16), freq=200000)       # Init I2C using pins GP8 & GP9 (default I2C0 pins)
print("I2C Address      : "+hex(i2c.scan()[0]).upper()) # Display device address
print("I2C Configuration: "+str(i2c))                   # Display I2C config
oled = SSD1306_I2C(WIDTH, HEIGHT, i2c)                  # Init oled display
 # Clear the oled display in case it has junk on it.
oled.fill(0)
# Add some text
oled.text("CIRCUIT DIGEST",5,8)
oled.text("INTERFACING THE",5,30)
oled.text("ULTRASONNIC",28,40)
oled.text("SENSOR",50,50)
# Finally update the oled display so the image & text is displayed
oled.show()
utime.sleep(4)
while True:
    oled.fill(0)
    measured_time = ultrasonnic()
    distance_cm = (measured_time * 0.0343) / 2
    distance_cm = round(distance_cm,2)
    oled.text("<ObjectDistance>",0,8)
    oled.text(">> "+str(distance_cm)+" cm",2,25)
    oled.show()
    utime.sleep(1)