Stepper மோட்டாரை Arduino UNO கொண்டு கட்டுப்படுத்துவது.
Required Components
- Stepper Motor (NEMA17) -1 no
- A4988 Stepper Driver -1 no
- 12V 2A Adapter -1 no
- Arduino Board UNO or MEGA -1 no
- Connecting wires -1 set
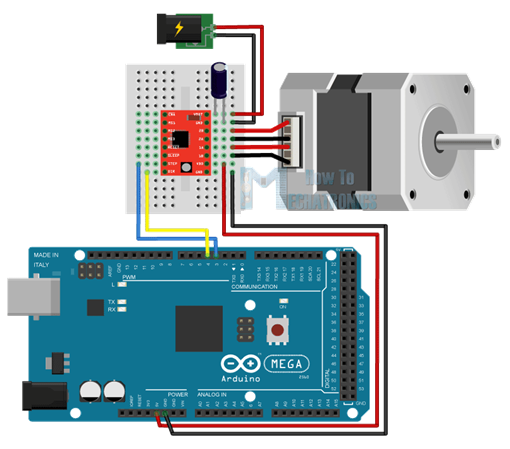
Circuit
Steps
- நாம் பயன்படுத்தும் உபகரணங்கள் சரியாக வேலை செய்கிறதா என்பதை உறுதி செய்து கொள்ளவும்.
- Stepper மோட்டார் Driver ஐ Arduino UNO உடன் இணைக்க வேண்டும்.
- Stepper மோட்டாரை Driver உடன் இணைக்க வேண்டும்.
- Stepper மோட்டார் உடன் வெளிப்புற power supply இணைக்க வேண்டும்.
- Arduino UNO பின்னான 3 &4 ஐ motor driver உடன் இணைக்க வேண்டும்.
- motor driver உடன் +5V மற்றும் Ground ஐ இணைக்க வேண்டும்.
- Arduino program ஐ சரி பார்க்க வேண்டும்.
- மின்சுற்றை சரி பார்க்க வேண்டும்.
- Arduino program ஐ ரன் செய்ய வேண்டும்.
Arduino Program
#include <Stepper.h>
const int stepPin = 3;
const int dirPin = 4;

void setup( )
{
  pinMode(stepPin,OUTPUT);
  pinMode(dirPin,OUTPUT);
}
void loop( )
{
  digitalWrite(dirPin,HIGH);
  for(int x = 0; x < 200; x++)
  {
    digitalWrite(stepPin,HIGH);
    delayMicroseconds(500);
    digitalWrite(stepPin,LOW);
    delayMicroseconds(500);
  }
  delay(1000);
  digitalWrite(dirPin,LOW);
  for(int x = 0; x < 400; x++)
  {
    digitalWrite(stepPin,HIGH);
    delayMicroseconds(500);
    digitalWrite(stepPin,LOW);
    delayMicroseconds(500);
  }
  delay(1000);
}
Usage
- பையகப்படுத்துதல்(Packaging)
- தொழில்
தானியங்குமயம் (industry
automation)
- கொணரிப்பட்டை (conveyer belt)
Projects
- ரோபோ கை (Robot arm)
- குப்பைத்தொட்டி(Dustbin)