Arduino UNO வை பயன்படுத்தி Hall effect Sensor ஐ கட்டுப்படுத்துவது.
Required Components
- Hall effect sensor -1 no
- magnets -1 no
- Arduino UNO -1 no
- Connecting wires -1 set
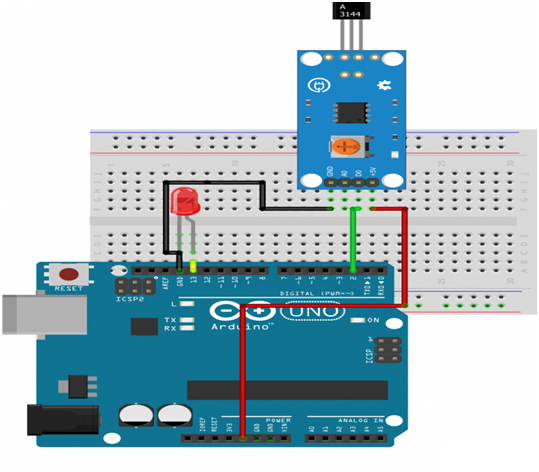
Circuit
Steps
- நாம் பயன்படுத்தும் உபகரணங்கள் சரியாக வேலை செய்கிறதா என்பதை உறுதி செய்து கொள்ளவும்.
- Hall effect Sensor ஐArduino UNO உடன் இணைக்க வேண்டும்.
- Arduino பின்னான 2 ஐ Hall effect Sensor(Analog)உடன் இணைக்க வேண்டும்.
- Arduino பின்னான 2 ஐ Hall effect சென்சார்(Digital)உடனும் இணைக்கலாம்.
- Hall effect Sensor உடன் +5V மற்றும் Ground ஐ இணைக்க வேண்டும்.
- Arduino program ஐ சரி பார்க்க வேண்டும்.
- மின்சுற்றை சரி பார்க்க வேண்டும்.
- Arduino program ஐ ரன் செய்ய வேண்டும்.
Arduino Program
int hallSensorPin = 2;
int ledPin =  13;
int state = 0;

void setup()
{
  pinMode(ledPin, OUTPUT);
  pinMode(hallSensorPin, INPUT);
}

void loop( )
{
  state = digitalRead(hallSensorPin);
  if (state == LOW)
  {
    digitalWrite(ledPin, HIGH);
  }
  else
  {
    digitalWrite(ledPin, LOW);
  }
}
Usage
- நிலைப்படுத்தல்(Positioning)
- வேகம் கண்டறிதல்(Speed detection)
- தற்போதைய உணர்திறன் பயன்பாடுகள்(Current sensing applications)
- சுழல்வேகமானி(Tachometers)
- பூட்டுதலில்லா நிறுத்த அமைப்பு(Anti-lock braking
systems)