Creating DF Player mini test program using Arduino UNO
Required Components
- DF Player mini -1 no
- Data Cable -1 no
- Connecting Wires -1 set
- Arduino Uno -1 no
- Speaker -1 no
- Resistor 1000ohm -1 no
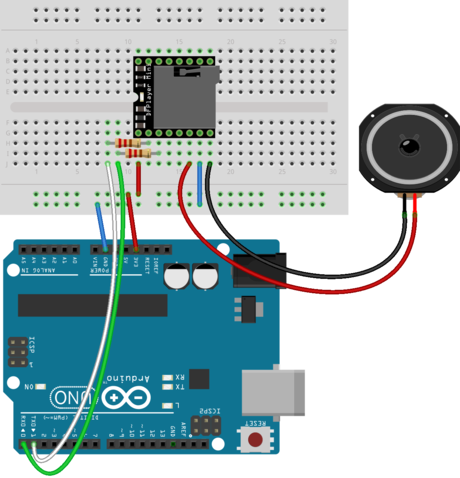
Circuit
Steps
- Make sure the components are working properly.
- Fix DF Player mini board to the bread board.
- Connect Arduino board 5V and GND pin to the DF Player Mini VCC and GND by using wires.
- Resistor one end connect to the DF Player Mini RX and the other end connect to the Arduino Uno Board 1 or TX.
- The second Resistor one end connect to the DF Player Mini TX and the other end connect to the Arduino Uno Board 0 or RX.
- Connect DF Player Mini SPK-1 & SPK-2 pins to the Speker.
- Check the Arduino program.
- Check the circuit connections.
- Run the Arduino program.
Arduino Program
#include "SoftwareSerial.h"
#include <DFMiniMp3.h>
#define DEBUG 0
class Mp3Notify
{
public:
 static void OnError(uint16_t errorCode)
 {
  Serial.println();
  Serial.print("Com Error ");
  Serial.println(errorCode);
 }
 static void OnPlayFinished(uint16_t track)
 {
  Serial.print("Play finished for #");
  Serial.println(track);
 }
 static void OnCardOnline(uint16_t code)
 {
  Serial.println("Card online ");
 }
 static void OnCardInserted(uint16_t code)
 {
  Serial.println("Card inserted ");
 }
 static void OnCardRemoved(uint16_t code)
 {
  Serial.println("Card removed ");
 }
};
SoftwareSerial secondarySerial(10, 11);
DFMiniMp3<SoftwareSerial, Mp3Notify> mp3(secondarySerial);
const int LDRpin = A0;
const int LEDpin = 13;
int Song=1;
int ldrStatus;
boolean onStatus = true;
boolean takeLowTime;
long unsigned int timeoutTimer = 0, resetCount = 0;
long unsigned int pause = 2000;

void setup()
{
 Serial.begin(115200);
 if (DEBUG) Serial.println("initializing...");
 pinMode(LDRpin, INPUT);
 pinMode(LEDpin, OUTPUT);
 mp3.begin();
 mp3.reset();
 uint16_t volume = mp3.getVolume();
 Serial.print("volume ");
 Serial.println(volume);
 mp3.setVolume(20);
 uint16_t count = mp3.getTotalTrackCount();
 Serial.print("files ");
 Serial.println(count);
 uint16_t mode = mp3.getPlaybackMode();
 Serial.print("playback mode ");
 Serial.println(mode);
 if (DEBUG) Serial.println("starting...");
 mp3.playFolderTrack(6, Song);
}

void loop()
{
 ldrStatus = analogRead(LDRpin);
 if (ldrStatus >=300)
  {
    digitalWrite(LEDpin, HIGH);
    mp3.start();
    onStatus = true;
  }
 else
  {
    digitalWrite(LEDpin, LOW);
    mp3.pause();
  }

 mp3.loop();
}
Usage
- Fire alarm voice prompts.
- Car navigation voice broadcast.
- Railway station, bus safety inspection voice prompts.
- Electricity, communications, financial business hall voice prompts