Python Tutorials – பாடம் 5 – Sweep Servo Motor Control Using Raspberry Pi Pico

Raspberry Pi Pico வை பயன்படுத்தி Servo மோட்டாரை சுற்ற வைப்பது

Required Components

  1. Servo motor(5V)-1 no
  2. Raspberry Pi Pico board-1 no
  3. Connecting wires-1 set
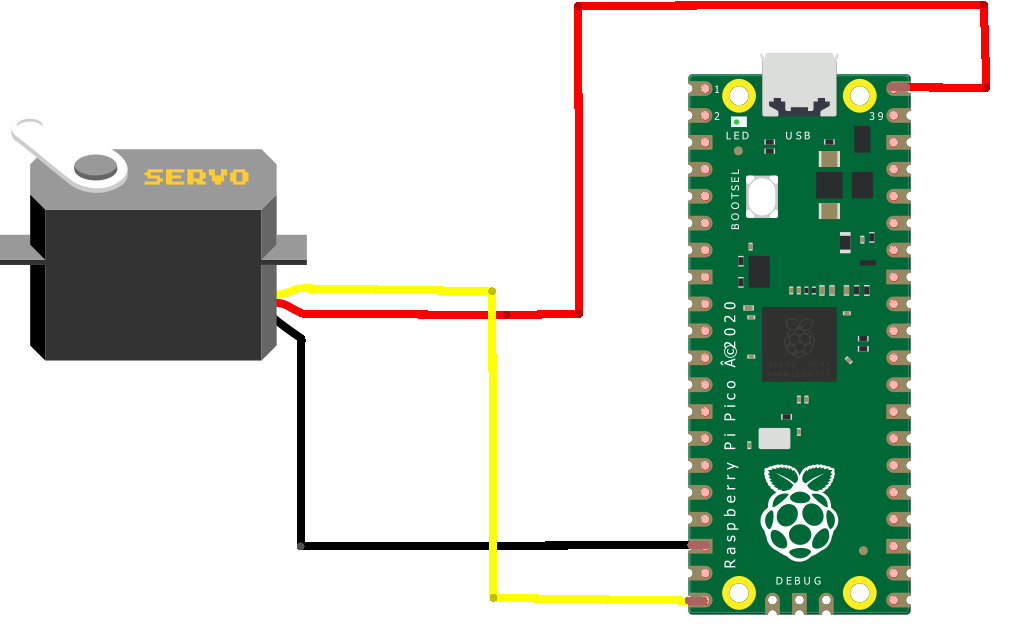
Circuit

Steps

  1. நாம் பயன்படுத்தும் உபகரணங்கள் சரியாக வேலை செய்கிறதா என்பதை உறுதி செய்து கொள்ளவும்.
  2. Servo மோட்டாருக்கு மூன்று இணைப்புகள் உள்ளன, அதில் ஒன்று data pin, +5v மற்றும் ground.
  3. Raspberry Pi Pico GP15 ஆவது இணைப்பை நேரடியாக மோட்டார் உடன் இணைக்க வேண்டும்.
  4. Servo வில் உள்ள +5v மற்றும் ground ஐ Raspberry Pi Pico VBus மற்றும் gnd உடன் இணைக்க வேண்டும்.
  5. Python program ஐ சரி பார்க்க வேண்டும்.
  6. மின்சுற்றை சரி பார்க்க வேண்டும்.
  7. Python program ஐ ரன் செய்ய வேண்டும்.

Python Program

from machine import Pin,PWM
import utime

MID = 1500000
MIN = 1000000
MAX = 2000000

led = Pin(25,Pin.OUT)
pwm = PWM(Pin(15))

pwm.freq(50)
pwm.duty_ns(MID)

while True:
    pwm.duty_ns(MIN)
    utime.sleep(1)
    pwm.duty_ns(MID)
    utime.sleep(1)
    pwm.duty_ns(MAX)
    utime.sleep(1)

Python Tutorials – Lesson 5 – Sweep Servo Motor Control Using Raspberry Pi Pico

To test servo motor using Raspberry Pi Pico

Required Components

  1. Servo motor (5V) _ 1 no
  2. Raspberry Pi Pico board _ 1 no
  3. Connecting wires _ 1 set

Circuit

Steps

  1. Make sure the components are working properly.
  2. Connect Raspberry Pi Pico board VBus and GND pin to the servo motor by using wires.
  3. Connect servo motor data pin to the Raspberry Pi Pico pin GP15.
  4. Check the Python program.
  5. Check the circuit connections.
  6. Run the Python program.

Python Program

from machine import Pin,PWM
import utime

MID = 1500000
MIN = 1000000
MAX = 2000000

led = Pin(25,Pin.OUT)
pwm = PWM(Pin(15))

pwm.freq(50)
pwm.duty_ns(MID)

while True:
    pwm.duty_ns(MIN)
    utime.sleep(1)
    pwm.duty_ns(MID)
    utime.sleep(1)
    pwm.duty_ns(MAX)
    utime.sleep(1)

Arduino Tutorials – Lesson 40 – Sweep Servo Motor Control Using Raspberry Pi Pico

To test servo motor using Raspberry Pi Pico

Required Components

  1. Servo motor (5V) _ 1 no
  2. Raspberry Pi Pico board _ 1 no
  3. Connecting wires _ 1 set

Circuit

Steps

  1. Make sure the components are working properly.
  2. Connect Raspberry Pi Pico board VBus and GND pin to the servo motor by using wires.
  3. Connect servo motor data pin to the Raspberry Pi Pico pin GP15.
  4. Check the Arduino program.
  5. Check the circuit connections.
  6. Run the Arduino program.

Arduino Program

#include<Servo.h>
Servo servo1;

void setup(  )
{
  servo1.attach(15);
}

void loop(  )
{
  servo1.write(0);
  delay(1000);
  servo1.write(90);
  delay(1000);
  servo1.write(180);
  delay(1000);
}