Arduino Tutorials – பாடம் 32 – L298N Motor Driver with Node MCU

2 DC மோட்டார்களை  NodeMCU ஐ உபயோகப்படுத்தி கட்டுப்படுத்துவது.

Required Components

  1. Node MCU -1 no
  2. L298N Motor Driver -1 no
  3. 9V Battery -1 no
  4. 5V DC Motor -2 no
  5. Motor wheel -2 no
  6. Cable -1 no
  7. Jumper Wires -7 no

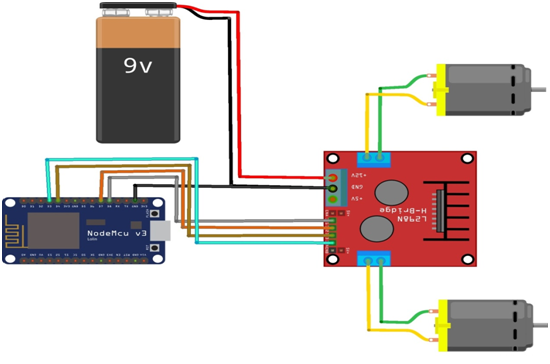
Circuit

Steps

  1. நாம் பயன்படுத்தும் உபகரணங்கள் சரியாக வேலை செய்கிறதா என்பதை உறுதி செய்து கொள்ளவும்.
  2. L298N Motor Driver உடன் 5V Battery ஐ கவனமாக இணைக்க வேண்டும்.
  3. L298N Motor Driver ENA, IN1, IN2, IN3, IN4, ENB பின்களை Node MCU D2, D0, D1, D7, D6, D5 உடன் இணைக்க வேண்டும்.
  4. L298N Motor Driver gnd உடன் Node MCU gnd ஐ இணைக்க வேண்டும்.
  5. L298N Motor Driver OUTPUT பின்களுடன் DC மோட்டார் OUTPUT பின்களை இணைக்க வேண்டும்.
  6. Node MCU உடன் Power ஐ இணைக்க வேண்டும்.
  7. Arduino program ஐ சரி பார்க்க வேண்டும்.
  8. மின்சுற்றை சரி பார்க்க வேண்டும்.
  9. Arduino program ஐ ரன் செய்ய வேண்டும்.

Arduino Program

#include <ESP8266WiFi.h>
const char* ssid = "*****";
const char* password = "*********";
int motor1pin1 = 16; //D0
int motor1pin2 = 5; //D1
int enPin1 = 4; //D2
int motor2pin1 = 13; //D7
int motor2pin2 = 12; //D6
int enPin2 = 14;//D5
WiFiServer server(80);

void setup() 
{
  Serial.begin(115200);
  delay(10);
  pinMode(motor1pin1, OUTPUT);
  pinMode(motor1pin2, OUTPUT);
  pinMode(enPin1, OUTPUT);
  digitalWrite(enPin1, HIGH);
  pinMode(motor2pin1, OUTPUT);
  pinMode(motor2pin2, OUTPUT);
  pinMode(enPin2, OUTPUT);
  digitalWrite(enPin2, HIGH);
  
  Serial.println();
  Serial.println();
  Serial.print("Connecting to ");
  Serial.println(ssid);
  WiFi.begin(ssid, password);

  while (WiFi.status() != WL_CONNECTED) 
  {
    delay(500);
    Serial.print(".");
  }
  Serial.println("");
  Serial.println("WiFi connected");
  server.begin();
  Serial.println("Server started");
  Serial.print("Use this URL to connect: ");
  Serial.print("http://");
  Serial.print(WiFi.localIP());
  Serial.println("/");
}

void loop() 
{
  WiFiClient client = server.available();
  if (!client) 
  {
    return;
  }
  Serial.println("new client");
  while(!client.available())
  {
    delay(1);
  }
  String request = client.readStringUntil('\r');
  Serial.println(request);
  client.flush();
  int value,value1 = LOW,value2 = LOW,value3 = LOW,value4 = LOW;
  if (request.indexOf("/MotorForward") != -1)
  {
    digitalWrite(motor1pin1, HIGH);
    digitalWrite(motor1pin2, LOW);
    digitalWrite(motor2pin1, HIGH);
    digitalWrite(motor2pin2, LOW);
    delay(1000);
    value1 = HIGH;
    value2 = LOW;
    value3 = HIGH;
    value4 = LOW;
  }
  if (request.indexOf("/MotorBackward") != -1)
  {
    digitalWrite(motor1pin1, LOW);
    digitalWrite(motor1pin2, HIGH);
    digitalWrite(motor2pin1, LOW);
    digitalWrite(motor2pin2, HIGH);
    delay(1000);
    value1 = LOW;
    value2 = HIGH;
    value3 = LOW;
    value4 = HIGH;
  }
  if (request.indexOf("/MotorLeft") != -1)
  {
    digitalWrite(motor1pin1, LOW);
    digitalWrite(motor1pin2, HIGH);
    digitalWrite(motor2pin1, HIGH);
    digitalWrite(motor2pin2, LOW);
    delay(1000);
    value1 = LOW;
    value2 = HIGH;
    value3 = HIGH;
    value4 = LOW;
  }
  if (request.indexOf("/MotorRight") != -1)
  {
    digitalWrite(motor1pin1, HIGH);
    digitalWrite(motor1pin2, LOW);
    digitalWrite(motor2pin1, LOW);
    digitalWrite(motor2pin2, HIGH);
    delay(1000);
    value1 = HIGH;
    value2 = LOW;
    value3 = LOW;
    value4 = HIGH;
  }
  if (request.indexOf("/MotorStop") != -1)
  {
    digitalWrite(motor1pin1, LOW);
    digitalWrite(motor1pin2, LOW);
    digitalWrite(motor2pin1, LOW);
    digitalWrite(motor2pin2, LOW);
    delay(1000);
    value1 = LOW;
    value2 = LOW;
    value3 = LOW;
    value4 = LOW;
  }
  client.println("HTTP/1.1 200 OK");
  client.println("Content-Type: text/html");
  client.println(""); //  do not forget this one
  client.println("<!DOCTYPE HTML>");
  client.println("<html>");
  client.print("motor is now: ");
  
  if(value1 == HIGH && value2 == LOW && value3 == HIGH && value4 == LOW ) {
    client.print("Forward");
  }
  else if(value1 == LOW && value2 == HIGH && value3 == LOW && value4 == HIGH  ) {
    client.print("Backward");
  }
  else if(value1 == LOW && value2 == HIGH && value3 == HIGH && value4 == LOW  ) {
    client.print("Left");
  }
  else if(value1 == HIGH && value2 == LOW && value3 == LOW && value4 == HIGH  ) {
    client.print("Right");
  }
  else if(value1 == LOW && value2 == LOW && value3 == LOW && value4 == LOW  ) {
    client.print("Stop");
  }
  client.println("<br><br>");
  client.println("<a href=\"/MotorForward\"\"><button>Forward </button></a>");
  client.println("<a href=\"/MotorBackward\"\"><button>Backward </button></a><br />");
  client.println("<a href=\"/MotorLeft\"\"><button>Left </button></a>");
  client.println("<a href=\"/MotorRight\"\"><button>Right </button></a><br />");
  client.println("<a href=\"/MotorStop\"\"><button>Stop </button></a>");
  client.println("</html>");
  delay(1);
  Serial.println("Client disonnected");
  Serial.println("");
}

Usage

  1. நேரோட்ட மின்சார இயக்கி(Drive DC motors)
  2. படிநிலை இயக்கி(Drive Stepping motors)
  3. ரோபாட்டிக்ஸ்(In Robotics)

Projects

  1. திவா ரோபோட் (Diwa Robot)

Arduino Tutorials – பாடம் 25 – L298N Motor Driver Module using Arduino UNO

L298N Motor Driver ஐ பயன்படுத்தி 2 DC மோட்டார்களை  கட்டுப்படுத்துவது.

Required Components

  1. L298N Motor Driver Module -1 no
  2. Arduino UNO -1 no
  3. DC Motor(gear) -2 no
  4. 12V Battery -1 no
  5. Data Cable -1 no
  6. Connecting Wires -4 no

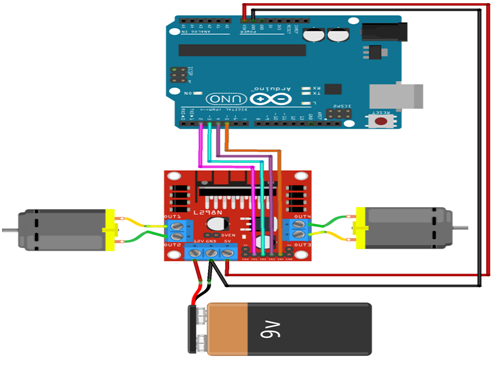
Circuit

Steps

  1. நாம் பயன்படுத்தும் உபகரணங்கள் சரியாக வேலை செய்கிறதா என்பதை உறுதி செய்து கொள்ளவும்.
  2. மோட்டார் Driver போர்டு உடன் +12V battery இணைக்க வேண்டும்.
  3. +12V பேட்டரி இணைப்புகளை சரியாகவும் கவனமாகவும் இணைக்க வேண்டும்.
  4. மோட்டார் Driver போர்டு ENA, IN1, IN2, IN3, IN4, ENB பின்களை Arduino பின்களான 4,2,3,5,6,7 உடன் இணைக்க வேண்டும்.
  5. மோட்டார் Driver போர்டு OUTPUT பின்களை DC மோட்டார் பின்களுடன் இணைக்க வேண்டும்.
  6. மோட்டார் Driver போர்டு gnd ஐ Arduino UNO board gnd உடன் இணைக்க வேண்டும்.
  7. Arduino program ஐ சரி பார்க்க வேண்டும்.
  8. மின்சுற்றை சரி பார்க்க வேண்டும்.
  9. Arduino program ஐ ரன் செய்ய வேண்டும்.

Arduino Program

int motor1pin1 = 2;
int motor1pin2 = 3;
int enPin1 = 4;

int motor2pin1 = 5;
int motor2pin2 = 6;
int enPin2 = 7;


void setup() 
{
  pinMode(motor1pin1, OUTPUT);
  pinMode(motor1pin2, OUTPUT);
  pinMode(enPin1, OUTPUT);
  digitalWrite(enPin1, HIGH);
  
  pinMode(motor2pin1, OUTPUT);
  pinMode(motor2pin2, OUTPUT);
  pinMode(enPin2, OUTPUT);
  digitalWrite(enPin2, HIGH);
}

void loop() 
{
  digitalWrite(motor1pin1, HIGH);
  digitalWrite(motor1pin2, LOW);
  digitalWrite(motor2pin1, HIGH);
  digitalWrite(motor2pin2, LOW);
  delay(1000);
  
  digitalWrite(motor1pin1, LOW);
  digitalWrite(motor1pin2, HIGH);
  digitalWrite(motor2pin1, LOW);
  digitalWrite(motor2pin2, HIGH);
  delay(1000);
}

Usage

  1. நேரோட்ட மின்சார இயக்கி(Drive DC motors)
  2. படிநிலை இயக்கி(Drive Stepping motors)
  3. ரோபாட்டிக்ஸ்(In Robotics)

Arduino Tutorials – பாடம் 23- L293D Motor Driver Control Shield with Arduino MEGA 2560

Arduino MEGA2560வை பயன்படுத்தி 2 DC மோட்டார்கள்,2 Servos மற்றும் 2 LED-களை ஒரே நேரத்தில் Bluetooth ஐ உபயோகப்படுத்தி கட்டுப்படுத்துவது.

Required Components

  1. L293D Motor Driver Control -1 no
  2. Arduino MEGA 2560 Board -1 no
  3. 5V DC Motors -2 no
  4. Servo -2 no
  5. LED -2 no
  6. 9V Battery -1 no
  7. Bluetooth -1 no
  8. USB cable -1 no
  9. Jumper Wires -10 no

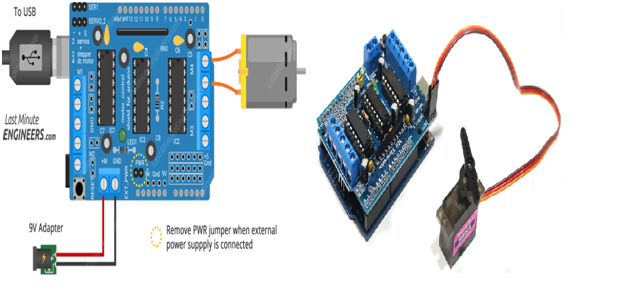
Circuit

Steps

  1. நாம் பயன்படுத்தும் உபகரணங்கள் சரியாக வேலை செய்கிறதா என்பதை உறுதி செய்து கொள்ளவும்.
  2. Motor control shield(L293D) உடன் +5V battery இணைக்க வேண்டும்.
  3. +5V பேட்டரி இணைப்புகளை சரியாகவும் கவனமாகவும் இணைக்க வேண்டும்.
  4. Motor control shield(L293D) M3,M4 ஐ 2 DC மோட்டார்களுடன் இணைக்க வேண்டும்.
  5. Motor control shield(L293D) Servo1,Servo2 ஐ 2 Servo மோட்டார்களுடன் இணைக்க வேண்டும்.
  6. 2 LED Cathodes(+) & Anode (-) பின்களை Arduino MEGA 2560 Board 50,52 பின்கள் & gnd உடன் இணைக்க வேண்டும்.
  7. Bluetooth VCC & gnd ஐ Arduino MEGA 2560 Board 5V & gnd உடன் இணைக்க வேண்டும்.
  8. Bluetooth RXD,TXD ஐ Arduino MEGA 2560 Board TXD,RXD உடன் முறையே இணைக்க வேண்டும்.
  9. Arduino MEGA 2560 Board உடன் +5V battery இணைக்க வேண்டும்.
  10. Arduino program ஐ சரி பார்க்க வேண்டும்.
  11. மின்சுற்றை சரி பார்க்க வேண்டும்.
  12. Arduino program ஐ ரன் செய்ய வேண்டும்.

Arduino Program

#include <AFMotor.h>
#include <Servo.h>
AF_DCMotor motor1(3);
AF_DCMotor motor2(4);
Servo servo1;
Servo servo2;
Servo servo3;
int pos1=20;
int pos1min=50;
int pos1max=110;
int pos2=90;
int pos2min=110;
int pos2max=170;
int pos3=80;
int pos3min=50;
int pos3max=110;
int i=0;
int delaytime=10;
int led1 = 50;
int led2 = 52;
String inputString = "";
boolean stringComplete = false;

void setup() 
{
  Serial1.begin(9600);
  motor1.setSpeed(200);
  motor2.setSpeed(200);
  motor1.run(RELEASE);
  motor2.run(RELEASE);
  servo1.attach(9);
  servo2.attach(10);
  servo3.attach(48);
  servo1.write(pos1);
  servo2.write(pos2);
  servo3.write(pos3);
  pinMode(led1,OUTPUT);
  pinMode(led2,OUTPUT);
  ledsOn();
}

void loop()
{
  ledsOn();
  serialEvent();
  if (stringComplete)
  {
    processCmd(inputString);
    inputString = "";
    stringComplete = false;
  }
}

void processCmd(String st1)
{
  st1.remove(st1.length());
  String cmd = st1.substring(0,1);
  st1="";
  if (cmd == "f")
  {
    motorForward();
  }
  else if (cmd == "b")
  {
    motorBackward();
  }
  else if (cmd == "r")
  {
    motorRight();
  }
  else if (cmd == "l")
  {
    motorLeft();
  }
  else if(cmd == "s")
  {
    motorStop();
  }
  else if(cmd == "1")
  {
    servoAction1();
  }
  else if(cmd == "2")
  {
    servoAction2();
  }
  else if (cmd=="o")
  {
    eyesBlink();
  }
}

void serialEvent()
{
  while (Serial1.available())
  {
    char inChar = (char)Serial1.read();
    inputString += inChar;
    if (inChar == '$')
    {
      stringComplete = true;
    }
  }
}
for(int i=0;i<5;i++)
{
  moveHandServoMotors(1);
}
delay(2000);
for(int i=0;i<5;i++)
{
  moveHandServoMotors(0);
}
delay(2000);


void motorForward()
{
  motor1.run(FORWARD);
  motor2.run(FORWARD);
  motor1.setSpeed(255);
  motor2.setSpeed(255);
}

void motorBackward()
{
  motor1.run(BACKWARD);
  motor2.run(BACKWARD);
  motor1.setSpeed(255);
  motor2.setSpeed(255);
}

void motorLeft()
{
  motor1.run(BACKWARD);
  motor2.run(FORWARD);
  motor1.setSpeed(255);
  motor2.setSpeed(255);
}

void motorRight()
{
  motor1.run(FORWARD);
  motor2.run(BACKWARD);
  motor1.setSpeed(255);
  motor2.setSpeed(255);
}

void motorStop()
{
  motor1.run(RELEASE);
  motor2.run(RELEASE);
}

void ledsOn()
{
  digitalWrite(led1,HIGH);
  digitalWrite(led2,HIGH);
}

void ledsOff()
{
  digitalWrite(led1,LOW);
  digitalWrite(led2,LOW);
}

void eyesBlink()
{
  for(int i=0;i<8;i++)
  {
    ledsOn();
    delay(250);
    ledsOff();
    delay(250);
  }
}

void servoAction1()
{
  for(int i=0;i<5;i++)
  {
    moveHandServoMotors(0);
  }
}

void servoAction2()
{
  for(int i=0;i<5;i++)
  {
    moveHandServoMotors(1);
  }
}

void moveHeadServoMotor(int tp)
{
  if (tp==0)
  {
    servo3.write(pos3min);
    delay(1000);
    servo3.write(pos3max);
    delay(3000);
  }
  if (tp==1)
  {
    for(int i=0;i<60;i++)
    {
      servo3.write(pos3min+i);
      delay(delaytime);
    }
    delay(1000);
    for(int i=0;i<60;i++)
    {
      servo3.write(pos3max-i);
      delay(delaytime);
    }
    delay(3000);
  }
}

void moveHandServoMotors(int tp)
{
  if (tp==0)
  {
    servo1.write(pos1min);
    servo2.write(pos2min);
    servo3.write(pos3min);
    for(int i=0;i<60;i++)
    {
      servo1.write(pos1min+i);
      servo2.write(pos2min+i);
      servo3.write(pos3min+i);
      delay(delaytime);
    }
    delay(200);
    for(int i=0;i<60;i++)
    {
      servo1.write(pos1max-i);
      servo2.write(pos2max-i);
      servo3.write(pos3max-i);
      delay(delaytime);
    }
    delay(200);
  }
  else if (tp==1)
  {
    servo1.write(pos1min);
    servo2.write(pos2max);
    servo3.write(pos3min);
    for(int i=0;i<60;i++)
    {
      servo1.write(pos1min+i);
      servo2.write(pos2max-i);
      servo3.write(pos3min+i);
      delay(delaytime);
    }
    delay(200);
    for(int i=0;i<60;i++)
    {
      servo1.write(pos1max-i);
      servo2.write(pos2min+i);
      servo3.write(pos3max-i);
      delay(delaytime);
    }
    delay(200);
  }
}

Usage

  1. நேரோட்ட மின்சார இயக்கி(Drive DC motors)
  2. படிநிலை இயக்கி(Drive Stepping motors)
  3. ரோபாட்டிக்ஸ்(In Robotics)

Projects

  1. திவா ரோபோட்(DIWA Robot)

Arduino Tutorials – Lesson 32 – L298N Motor Driver with Node MCU

Creating 2 DC Motors control program using Node MCU

Required Components

  1. Node MCU -1 no
  2. L298N Motor Driver -1 no
  3. 9V Battery -1 no
  4. 5V DC Motor -2 no
  5. Motor wheel -2 no
  6. Cable -1 no
  7. Jumper Wires -7 no

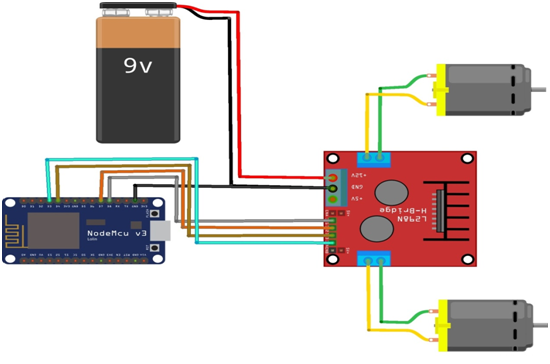
Circuit

Steps

  1. Make sure the components are working properly.
  2. Connect the 5V Battery to the L298N Motor Driver.
  3. Connect the ENA, IN1, IN2, IN3, IN4, ENB pins to the Node MCU pins D2, D0, D1, D7, D6, D5 properly.
  4. Connect the DC motor pins to the motor driver output pins.
  5. Connect the Node MCU ground connection to the driver gnd respectively.
  6. Connect the Power to the NodeMCU.
  7. Check the Arduino program.
  8. Check the Circuit Connections.
  9. Run the Arduino program.

Arduino Program

#include <ESP8266WiFi.h>
const char* ssid = "*****";
const char* password = "*********";
int motor1pin1 = 16; //D0
int motor1pin2 = 5; //D1
int enPin1 = 4; //D2
int motor2pin1 = 13; //D7
int motor2pin2 = 12; //D6
int enPin2 = 14;//D5
WiFiServer server(80);

void setup() 
{
  Serial.begin(115200);
  delay(10);
  pinMode(motor1pin1, OUTPUT);
  pinMode(motor1pin2, OUTPUT);
  pinMode(enPin1, OUTPUT);
  digitalWrite(enPin1, HIGH);
  pinMode(motor2pin1, OUTPUT);
  pinMode(motor2pin2, OUTPUT);
  pinMode(enPin2, OUTPUT);
  digitalWrite(enPin2, HIGH);
  
  Serial.println();
  Serial.println();
  Serial.print("Connecting to ");
  Serial.println(ssid);
  WiFi.begin(ssid, password);

  while (WiFi.status() != WL_CONNECTED) 
  {
    delay(500);
    Serial.print(".");
  }
  Serial.println("");
  Serial.println("WiFi connected");
  server.begin();
  Serial.println("Server started");
  Serial.print("Use this URL to connect: ");
  Serial.print("http://");
  Serial.print(WiFi.localIP());
  Serial.println("/");
}

void loop() 
{
  WiFiClient client = server.available();
  if (!client) 
  {
    return;
  }
  Serial.println("new client");
  while(!client.available())
  {
    delay(1);
  }
  String request = client.readStringUntil('\r');
  Serial.println(request);
  client.flush();
  int value,value1 = LOW,value2 = LOW,value3 = LOW,value4 = LOW;
  if (request.indexOf("/MotorForward") != -1)
  {
    digitalWrite(motor1pin1, HIGH);
    digitalWrite(motor1pin2, LOW);
    digitalWrite(motor2pin1, HIGH);
    digitalWrite(motor2pin2, LOW);
    delay(1000);
    value1 = HIGH;
    value2 = LOW;
    value3 = HIGH;
    value4 = LOW;
  }
  if (request.indexOf("/MotorBackward") != -1)
  {
    digitalWrite(motor1pin1, LOW);
    digitalWrite(motor1pin2, HIGH);
    digitalWrite(motor2pin1, LOW);
    digitalWrite(motor2pin2, HIGH);
    delay(1000);
    value1 = LOW;
    value2 = HIGH;
    value3 = LOW;
    value4 = HIGH;
  }
  if (request.indexOf("/MotorLeft") != -1)
  {
    digitalWrite(motor1pin1, LOW);
    digitalWrite(motor1pin2, HIGH);
    digitalWrite(motor2pin1, HIGH);
    digitalWrite(motor2pin2, LOW);
    delay(1000);
    value1 = LOW;
    value2 = HIGH;
    value3 = HIGH;
    value4 = LOW;
  }
  if (request.indexOf("/MotorRight") != -1)
  {
    digitalWrite(motor1pin1, HIGH);
    digitalWrite(motor1pin2, LOW);
    digitalWrite(motor2pin1, LOW);
    digitalWrite(motor2pin2, HIGH);
    delay(1000);
    value1 = HIGH;
    value2 = LOW;
    value3 = LOW;
    value4 = HIGH;
  }
  if (request.indexOf("/MotorStop") != -1)
  {
    digitalWrite(motor1pin1, LOW);
    digitalWrite(motor1pin2, LOW);
    digitalWrite(motor2pin1, LOW);
    digitalWrite(motor2pin2, LOW);
    delay(1000);
    value1 = LOW;
    value2 = LOW;
    value3 = LOW;
    value4 = LOW;
  }
  client.println("HTTP/1.1 200 OK");
  client.println("Content-Type: text/html");
  client.println(""); //  do not forget this one
  client.println("<!DOCTYPE HTML>");
  client.println("<html>");
  client.print("motor is now: ");
  
  if(value1 == HIGH && value2 == LOW && value3 == HIGH && value4 == LOW ) {
    client.print("Forward");
  }
  else if(value1 == LOW && value2 == HIGH && value3 == LOW && value4 == HIGH  ) {
    client.print("Backward");
  }
  else if(value1 == LOW && value2 == HIGH && value3 == HIGH && value4 == LOW  ) {
    client.print("Left");
  }
  else if(value1 == HIGH && value2 == LOW && value3 == LOW && value4 == HIGH  ) {
    client.print("Right");
  }
  else if(value1 == LOW && value2 == LOW && value3 == LOW && value4 == LOW  ) {
    client.print("Stop");
  }
  client.println("<br><br>");
  client.println("<a href=\"/MotorForward\"\"><button>Forward </button></a>");
  client.println("<a href=\"/MotorBackward\"\"><button>Backward </button></a><br />");
  client.println("<a href=\"/MotorLeft\"\"><button>Left </button></a>");
  client.println("<a href=\"/MotorRight\"\"><button>Right </button></a><br />");
  client.println("<a href=\"/MotorStop\"\"><button>Stop </button></a>");
  client.println("</html>");
  delay(1);
  Serial.println("Client disonnected");
  Serial.println("");
}

Usage

  1. Drive DC motors
  2. Drive Stepping motors
  3. In Robotics

Projects

  1. Diwa Robot

Arduino Tutorials – Lesson 25 – L298N Motor Driver Module using Arduino UNO

Creating 4 DC motors or 2 DC motors with directional and speed control program using Arduino UNO

Required Components

  1. L298N Motor Driver Module -1 no
  2. Arduino UNO -1 no
  3. DC Motor(gear) -2 no
  4. 12V Battery -1 no
  5. Data Cable -1 no
  6. Connecting Wires -4 no

Circuit

Steps

  1. Make sure the components are working properly.
  2. Connect the 12V Battery to the L298N Motor Driver.
  3. Connect the ENA, IN1, IN2, IN3, IN4, ENB pins to the Arduino UNO board pins 4, 2, 3,5, 6, 7 properly.
  4. Connect the DC motor pins to the motor driver output pins.
  5. Connect the ground connection respectively.
  6. Check the Circuit Connections.
  7. Check the Arduino program.
  8. Run the Arduino program.

Arduino Program

int motor1pin1 = 2;
int motor1pin2 = 3;
int enPin1 = 4;

int motor2pin1 = 5;
int motor2pin2 = 6;
int enPin2 = 7;


void setup() 
{
  pinMode(motor1pin1, OUTPUT);
  pinMode(motor1pin2, OUTPUT);
  pinMode(enPin1, OUTPUT);
  digitalWrite(enPin1, HIGH);
  
  pinMode(motor2pin1, OUTPUT);
  pinMode(motor2pin2, OUTPUT);
  pinMode(enPin2, OUTPUT);
  digitalWrite(enPin2, HIGH);
}

void loop() 
{
  digitalWrite(motor1pin1, HIGH);
  digitalWrite(motor1pin2, LOW);
  digitalWrite(motor2pin1, HIGH);
  digitalWrite(motor2pin2, LOW);
  delay(1000);
  
  digitalWrite(motor1pin1, LOW);
  digitalWrite(motor1pin2, HIGH);
  digitalWrite(motor2pin1, LOW);
  digitalWrite(motor2pin2, HIGH);
  delay(1000);
}

Usage

  1. Drive DC motors.
  2. Drive Stepping motors.
  3. In Robotics.