Raspberry Pi Pico வை பயன்படுத்தி Buzzer (ஒலிப்பான்) ஐ கட்டுபடுத்துவது
Required Components
- Buzzer module-1 no
- Raspberry Pi Pico-1 no
- Connecting wires-1 set
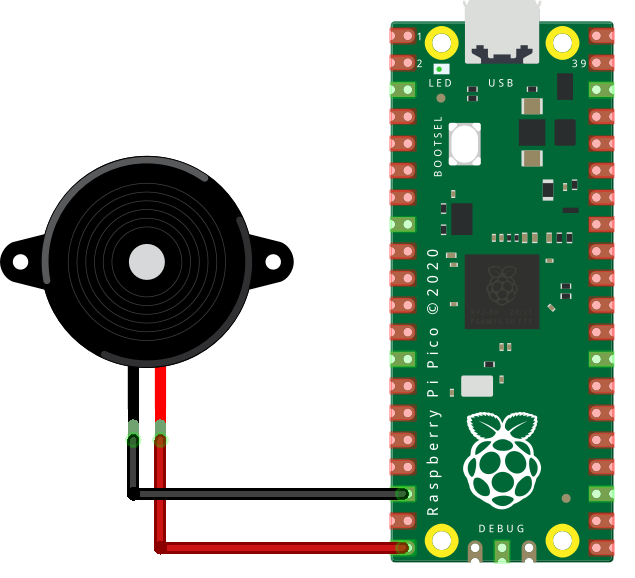
Circuit

Steps
- நாம் பயன்படுத்தும் உபகரணங்கள் சரியாக வேலை செய்கிறதா என்பதை உறுதி செய்து கொள்ளவும்.
- Buzzer (ஒலிப்பான்) ஐ Raspberry Pi Pico GP15உடன் இணைக்க வேண்டும்.
- Buzzer (ஒலிப்பான்) Ground உடன் Raspberry Pi Pico Ground ஐ இணைக்க வேண்டும்.
- Python program ஐ சரி பார்க்க வேண்டும்.
- மின்சுற்றை சரி பார்க்க வேண்டும்.
- Python program ஐ ரன் செய்ய வேண்டும்.
Python Program
from machine import Pin, PWM
from utime import sleep
buzzer = PWM(Pin(15))

tones = {
"B0": 31,
"C1": 33,
"CS1": 35,
"D1": 37,
"DS1": 39,
"E1": 41,
"F1": 44,
"FS1": 46,
"G1": 49,
"GS1": 52,
"A1": 55,
"AS1": 58,
"B1": 62,
"C2": 65,
"CS2": 69,
"D2": 73,
"DS2": 78,
"E2": 82,
"F2": 87,
"FS2": 93,
"G2": 98,
"GS2": 104,
"A2": 110,
"AS2": 117,
"B2": 123,
"C3": 131,
"CS3": 139,
"D3": 147,
"DS3": 156,
"E3": 165,
"F3": 175,
"FS3": 185,
"G3": 196,
"GS3": 208,
"A3": 220,
"AS3": 233,
"B3": 247,
"C4": 262,
"CS4": 277,
"D4": 294,
"DS4": 311,
"E4": 330,
"F4": 349,
"FS4": 370,
"G4": 392,
"GS4": 415,
"A4": 440,
"AS4": 466,
"B4": 494,
"C5": 523,
"CS5": 554,
"D5": 587,
"DS5": 622,
"E5": 659,
"F5": 698,
"FS5": 740,
"G5": 784,
"GS5": 831,
"A5": 880,
"AS5": 932,
"B5": 988,
"C6": 1047,
"CS6": 1109,
"D6": 1175,
"DS6": 1245,
"E6": 1319,
"F6": 1397,
"FS6": 1480,
"G6": 1568,
"GS6": 1661,
"A6": 1760,
"AS6": 1865,
"B6": 1976,
"C7": 2093,
"CS7": 2217,
"D7": 2349,
"DS7": 2489,
"E7": 2637,
"F7": 2794,
"FS7": 2960,
"G7": 3136,
"GS7": 3322,
"A7": 3520,
"AS7": 3729,
"B7": 3951,
"C8": 4186,
"CS8": 4435,
"D8": 4699,
"DS8": 4978
}

song = ["E5","G5","A5","P","E5","G5","B5","A5","P","E5","G5","A5","P","G5","E5"]
#song = ["G4","A4","C5","F5","D5","F5","G5","F5","D5","C5","A4","C5","D5","F5","G5","G5","G5","A5","G5","G5","F5"]
#song = ["B4","B4","B4","C5","C5","C5","F5","F5","G5","F5","D5","C5","C5","B4"]


def playtone(frequency):
    buzzer.duty_u16(5000)
    buzzer.freq(frequency)

def bequiet():
    buzzer.duty_u16(0)

def playsong(mysong):
    for i in range(len(mysong)):
        if (mysong[i] == "P"):
            bequiet()
        else:
            playtone(tones[mysong[i]])
        sleep(0.3)
    bequiet()
playsong(song)