ஒரு புஷ் பட்டன் ஐ பயன்படுத்தி ஒரு LEDஐ ஒளிர வைப்பது
Required Components
- LED-1 no
- 220 Ω Resistor-1 no
- 10 K Ω Resistor-1 no
- Pushbutton-1 no
- Bread Board-1 no
- Raspberry Pi Pico-1 no
- Connecting wires-1 Set
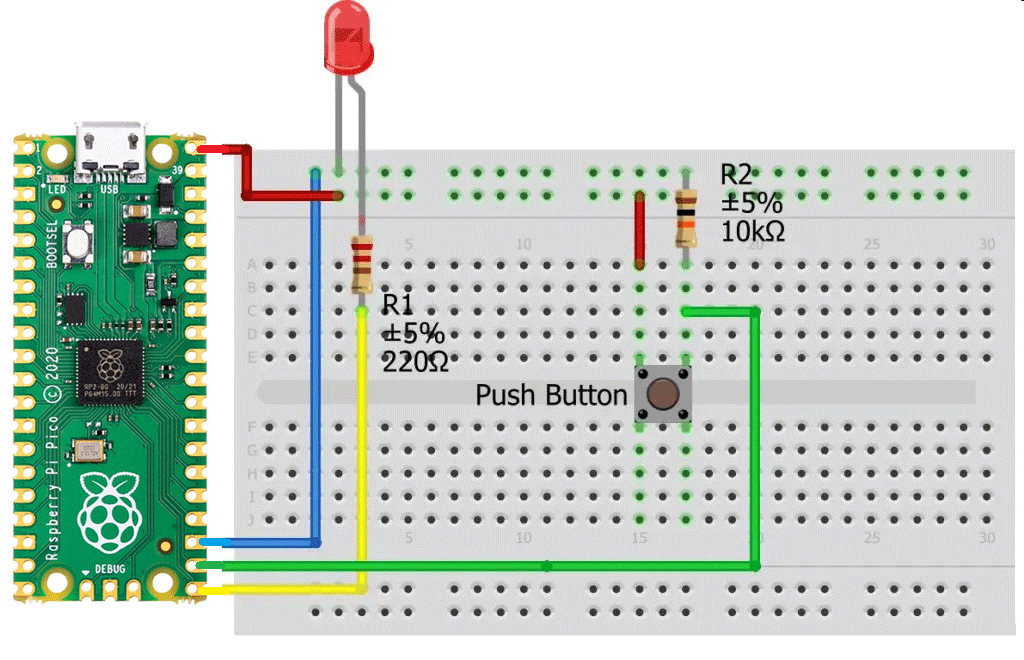
Circuit
Steps
- நாம் பயன்படுத்தும் உபகரணங்கள் சரியாக வேலை செய்கிறதா என்பதை உறுதி செய்து கொள்ளவும்.
- இரண்டு வகையான மின்தடைகளை எடுத்து கொள்ளவும் ஒன்று 10K மற்றறொன்று 220 Ohm.
- 220Ohm மின்தடையை LED உடனும் 10K மின்தடையை சுவிட்ச் உடனும் இணைக்க வேண்டும்.
- அந்த புஷ்பட்டன் ஐ Raspberry Pi Pico GP17 உடன் இணைக்க வேண்டும்.
- 220Ohm மின்தடையை LED + உடன் மற்றும் LED – ஐ GND உடன் இணைக்க வேண்டும்.
- 220Ohm மின்தடையை Raspberry Pi Pico GP16 உடன் இணைக்க வேண்டும்.
- புஷ் பட்டன் ஐ அழுத்தும் போது LED ஒளிர வேண்டும்.
- Arduino program ஐ சரி பார்க்க வேண்டும்.
- மின்சுற்றை சரி பார்க்க வேண்டும்.
- Arduino program ஐ ரன் செய்ய வேண்டும்.
Arduino Program
int ledPin = 16;
int buttonPin = 17;

void setup()
{
  pinMode(ledPin, OUTPUT);
  pinMode(buttonPin, INPUT);
}


void loop()
{
  int button = digitalRead(buttonPin);
  if (button==HIGH)
  {
    digitalWrite(ledPin,HIGH);
  }
  else
  {
    digitalWrite(ledPin, LOW);
  }
}
