Python Tutorials – பாடம் 7 – LDR Sensor on Raspberry Pi Pico

Raspberry Pi Pico வை பயன்படுத்தி LDR ஐ கட்டுப்படுத்துவது

Required Components

  1. LDR Sensor-1 no
  2. Raspberry Pi Pico board-1 no
  3. Connecting wires-1 set

Circuit

Steps

  1. நாம் பயன்படுத்தும் உபகரணங்கள் சரியாக வேலை செய்கிறதா என்பதை உறுதி செய்து கொள்ளவும்.
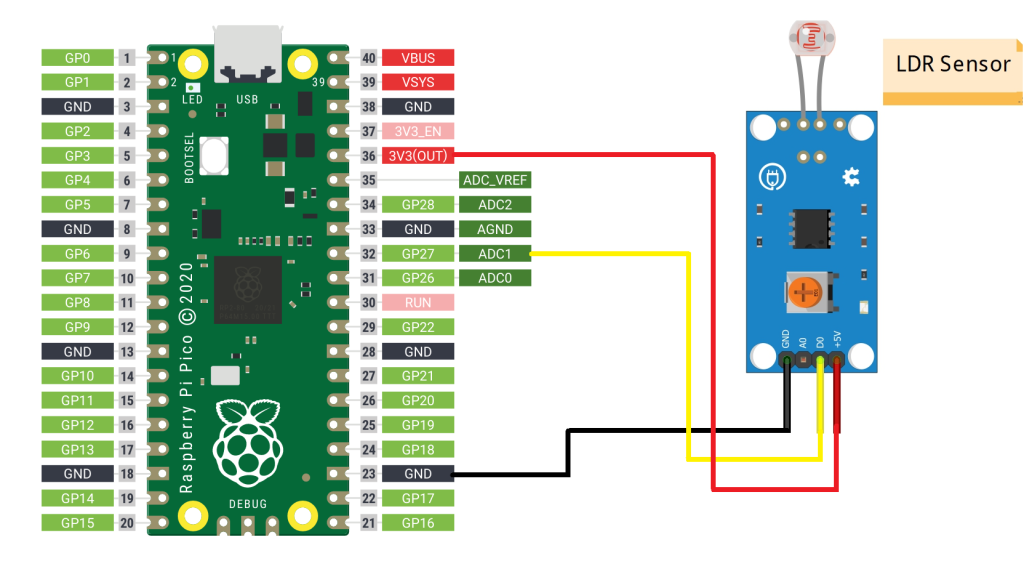
  2. Raspberry Pi Pico பின்னான GP27 ஐ LDR பின்னான D0 உடன் இணைக்க வேண்டும்.
  3. Raspberry Pi Pico பின்னான 3V3 (OUT) ஐ LDR பின்னான +5V உடன் இணைக்க வேண்டும்.
  4. Raspberry Pi Pico GND உடன் LDR GND ஐ இணைக்க வேண்டும்.
  5. Python program ஐ சரி பார்க்க வேண்டும்.
  6. மின்சுற்றை சரி பார்க்க வேண்டும்.
  7. Python program ஐ ரன் செய்ய வேண்டும்.

Python Program

from machine import Pin
import time
 
ldr = machine.ADC(27)
 
while True:
     print(ldr.read_u16())
     time.sleep(2)

Arduino Tutorials – பாடம் 42 – LDR Sensor on Raspberry Pi Pico

Raspberry Pi Pico வை பயன்படுத்தி LDR ஐ கட்டுப்படுத்துவது.

Required Components

  1. LDR Sensor-1 no
  2. Raspberry Pi Pico board-1 no
  3. Connecting wires-1 set

Circuit

Steps

  1. நாம் பயன்படுத்தும் உபகரணங்கள் சரியாக வேலை செய்கிறதா என்பதை உறுதி செய்து கொள்ளவும்.
  2. Raspberry Pi Pico பின்னான GP27 ஐ LDR பின்னான D0 உடன் இணைக்க வேண்டும்.
  3. Raspberry Pi Pico பின்னான 3V3 (OUT) ஐ LDR பின்னான +5V உடன் இணைக்க வேண்டும்.
  4. Raspberry Pi Pico GND உடன் LDR GND ஐ இணைக்க வேண்டும்.
  5. Arduino program ஐ சரி பார்க்க வேண்டும்.
  6. மின்சுற்றை சரி பார்க்க வேண்டும்.
  7. Arduino program ஐ ரன் செய்ய வேண்டும்.

Arduino Program

const int ledPin=25;
const int ldrPin=27;

void setup(  )
{
  Serial.begin(9600);
  pinMode (ledPin,OUTPUT);
  pinMode (ldrPin,INPUT);
}

void loop( )
{
  int ldrstatus = analogRead(ldrPin);
  if (ldrstatus<=300)
  {
    digitalWrite(ledPin,HIGH);
    Serial.print("LDR in Dark,LED is ON");
  }
  else
  {
    digitalWrite(ledPin,LOW);
    Serial.print ("LDR in Light,LED Is Off");
  }
}
Python Tutorials – Lesson 7 – LDR Sensor on Raspberry Pi Pico

To control LDR Sensor using Raspberry Pi Pico Board

Required Components

  1. LDR Sensor_1 no
  2. Raspberry Pi Pico board_1 no
  3. Connecting wires_1 set

Circuit

Steps

  1. Make sure the components are working properly.
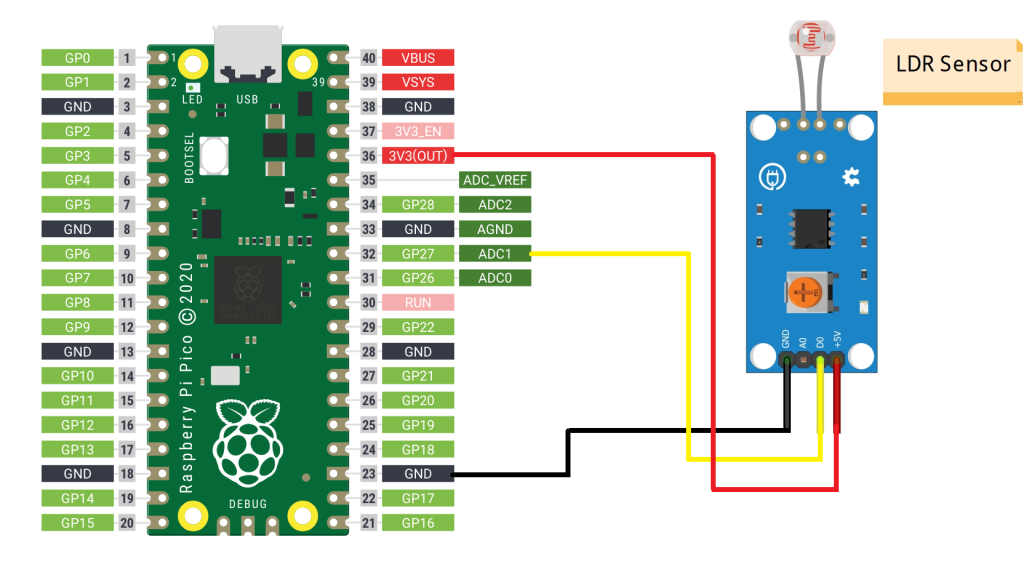
  2. Connect the Raspberry Pi Pico GP27 pin to the LDR D0 pin.
  3. Connect the Raspberry Pi Pico 3V3 (OUT) pin to the LDR +5V pin.
  4. Connect the Raspberry Pi Pico GND to the LDR GND pin.
  5. Check the Python program.
  6. Check the Electrical circuit.
  7. Run the Python program.

Python Program

from machine import Pin
import time
 
ldr = machine.ADC(27)
 
while True:
     print(ldr.read_u16())
     time.sleep(2)

Arduino Tutorials – Lesson 42 – LDR Sensor on Raspberry Pi Pico

To control LDR Sensor using Raspberry Pi Pico Board

Required Components

  1. LDR Sensor_1 no
  2. Raspberry Pi Pico board_1 no
  3. Connecting wires_1 set

Circuit

Steps

  1. Make sure the components are working properly.
  2. Connect the Raspberry Pi Pico GP27 pin to the LDR D0 pin.
  3. Connect the Raspberry Pi Pico 3V3 (OUT) pin to the LDR +5V pin.
  4. Connect the Raspberry Pi Pico GND to the LDR GND pin.
  5. Check the Arduino program.
  6. Check the Electrical circuit.
  7. Run the Arduino program.

Arduino Program

const int ledPin=25;
const int ldrPin=27;

void setup(  )
{
  Serial.begin(9600);
  pinMode (ledPin,OUTPUT);
  pinMode (ldrPin,INPUT);
}

void loop( )
{
  int ldrstatus = analogRead(ldrPin);
  if (ldrstatus<=300)
 {
    digitalWrite(ledPin,HIGH);
    Serial.print("LDR in Dark,LED is ON");
  }
  else
  {
    digitalWrite(ledPin,LOW);
    Serial.print ("LDR in Light,LED Is Off");
  }
}

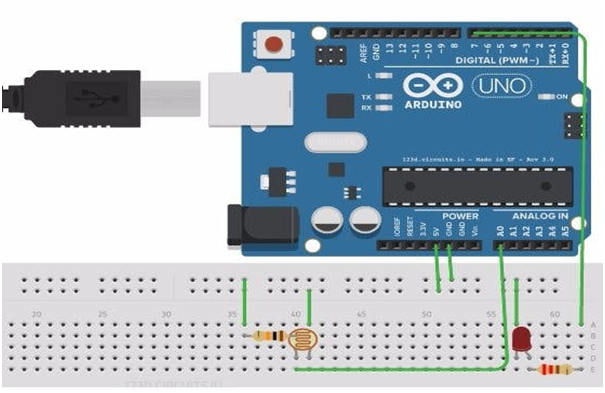
Arduino Tutorials – பாடம் 8 – LDR Sensor on Arduino UNO

Arduino UNO  வை பயன்படுத்தி LDR ஐ கட்டுப்படுத்துவது.

Required Components

  1. LED -1 no
  2. LDR -1 no
  3. Resistor 10K Ω -1 no
  4. Resistor 220 Ω -1 no
  5. Bread board -1 no
  6. Arduino UNO board -1 no
  7. Connecting cables -1 set

Circuit

Steps

  1. நாம் பயன்படுத்தும் உபகரணங்கள் சரியாக வேலை செய்கிறதா என்பதை உறுதி செய்து கொள்ளவும்.
  2. LDR ஐ LED உடன் Bread Board ன் உதவியுடன் இணைக்க வேண்டும்.
  3. இரண்டு வகையான ரெசிஸ்டர் களை எடுத்து கொள்ளவும் ஒன்று 10K மற்றறொன்று 220 Ohm.
  4. Arduino பின்னான A0 ஐ LDR உடன் இணைக்க வேண்டும்.
  5. Arduino பின்னான 7ஐ LED உடன் இணைக்க வேண்டும்.
  6. Bread board உடன் +5V மற்றும் Ground ஐ ஒயர்களை கொண்டு இணைக்க வேண்டும்.
  7. Arduino program ஐ சரி பார்க்க வேண்டும்.
  8. மின்சுற்றை சரி பார்க்க வேண்டும்.
  9. Arduino program ஐ ரன் செய்ய வேண்டும்.

Arduino Program

const int ledPin=13;
const int ldrPin=A0;

void setup(  )
{
  Serial.begin(9600);
  pinMode (ledPin,OUTPUT);
  pinMode (ldrPin,INPUT);
}

void loop( )
{
  int ldrstatus = analogRead(ldrPin);
  if (ldrstatus<=300)
  {
    digitalWrite(ledPin,HIGH);
    Serial.print("LDR in Dark,LED is ON");
  }
  else
  {
    digitalWrite(ledPin,LOW);
    Serial.print ("LDR in Light,LED Is Off");
  }
}
Usage

  1. அலாரம் கடிகாரங்கள்(Alarm clocks)
  2. தெரு விளக்குகள்(Street lights)
  3. ஒளிச்செறிவு(Light intensity meters)
  4. பர்க்லர் அலாரம் சுற்று(Burglar alarm circuits)

Projects

  1. Shooting game