Arduino Tutorials – Lesson 4 – Sweep Servo Motor Control Using Arduino UNO

Creating servo motor program using Arduino UNO

Required Components

  1. Servo motor (5V) -1 no
  2. Arduino UNO board -1 no
  3. Connecting wires -1 set

Circuit

Steps

  1. Make sure the components are working properly.
  2. Connect Arduino board 5v and GND pin to the servo motor by using wires.
  3. Connect servo motor data pin to the Arduino UNO pin 9.
  4. Check the Arduino program.
  5. Check the circuit connections.
  6. Run the Arduino program.

Arduino Program

#include<Servo.h>
Servo servo1;

void setup(  )
{
  servo1.attach(9);
}

void loop(  )
{
  servo1.write(0);
  delay(1000);
  servo1.write(90);
  delay(1000);
  servo1.write(180);
  delay(1000);
}

Usage

  1. Industrial robotics.
  2. CD/DVD players.
  3. Elevators.
  4. Rudders.
  5. Automated doors.

Projects

  1. Robot-Arm.
  2. Sensor dustbin.

Arduino Tutorials – Lesson 3 – Three LED Blink Using Arduino UNO

Creating three LED blink program using Arduino UNO

Required Components

  1. LED -3 no
  2. Resistor 220Ω -3 no
  3. Arduino UNO board -1 no
  4. Bread Board -1 no
  5. Connecting wires -1 set

Circuit

Steps

  1. Make sure the components are working properly.
  2. Connect Arduino board 5v and GND pin to the breadboard by using wires.
  3. Connect 220 Ω Resistors to the each LED Anode (+) pin and both cathode (-) pin to GND through breadboard.
  4. Connect Arduino 11, 12, 13 pin to the 220 Ω Resistors another end.
  5. Check the Arduino program.
  6. Check the circuit connections.
  7. Run the Arduino program.

Arduino Program

int led1=11;
int led2=12;
int led3=13;

void setup (  )
{
  pinMode (led1, OUTPUT);
  pinMode (led2, OUTPUT;
  pinMode (led3, OUTPUT);
}


void loop (  )
{
  digitalWrite (led1, HIGH);
  digitalWrite (led2, LOW);
  digitalWrite (led3, LOW);
  delay (1000);
  
  digitalWrite (led3, LOW);
  digitalWrite (led1, LOW);
  digitalWrite (led2, HIGH);
  delay (1000);
  
  digitalWrite (led1, LOW);
  digitalWrite (led2, LOW);
  digitalWrite (led3, HIGH);
  delay (1000);
}

Usage

  1. Focused lights.
  2. Residential and business lighting.
  3. Desk lamps.
  4. Lighting for signage.

Arduino Tutorials – Lesson 2 – Double LED blink using Arduino UNO

Creating Double LED blink program using Arduino UNO

Required Components

  1. Led -2 no
  2. Resistor 220Ω -2 no
  3. Arduino board -1 no
  4. Bread Board -1 no
  5. Connecting wires -1 set

Circuit

Steps

  1. Make sure the components are working properly.
  2. Connect Arduino board 5v and GND pin to the bread board by using wires.
  3. Connect 220 Ω Resistors to the each LED Anode (+) pin and both cathode (-) pin to Gnd.
  4. Connect Arduino 9, 10 pin to the each 220 Ω Resistors another end.
  5. Check the Arduino program.
  6. Check the circuit connections.
  7. Run the Arduino program.

Arduino Program

int led1 = 9;
int led2 = 10;

void setup()
{
  pinMode (led1, OUTPUT);
  pinMode (led2, OUTPUT;
}

void loop()
{
  digitalWrite (led1, LOW);
  digitalWrite (led2, HIGH);
  delay (500);
  
  digitalWrite (led1, HIGH);
  digitalWrite (led2, LOW);
  delay (500);
}

Usage

  1. Reading lights.
  2. Night lights.
  3. Security lights.

AutoPot – Automatic Water Dispensing Pot

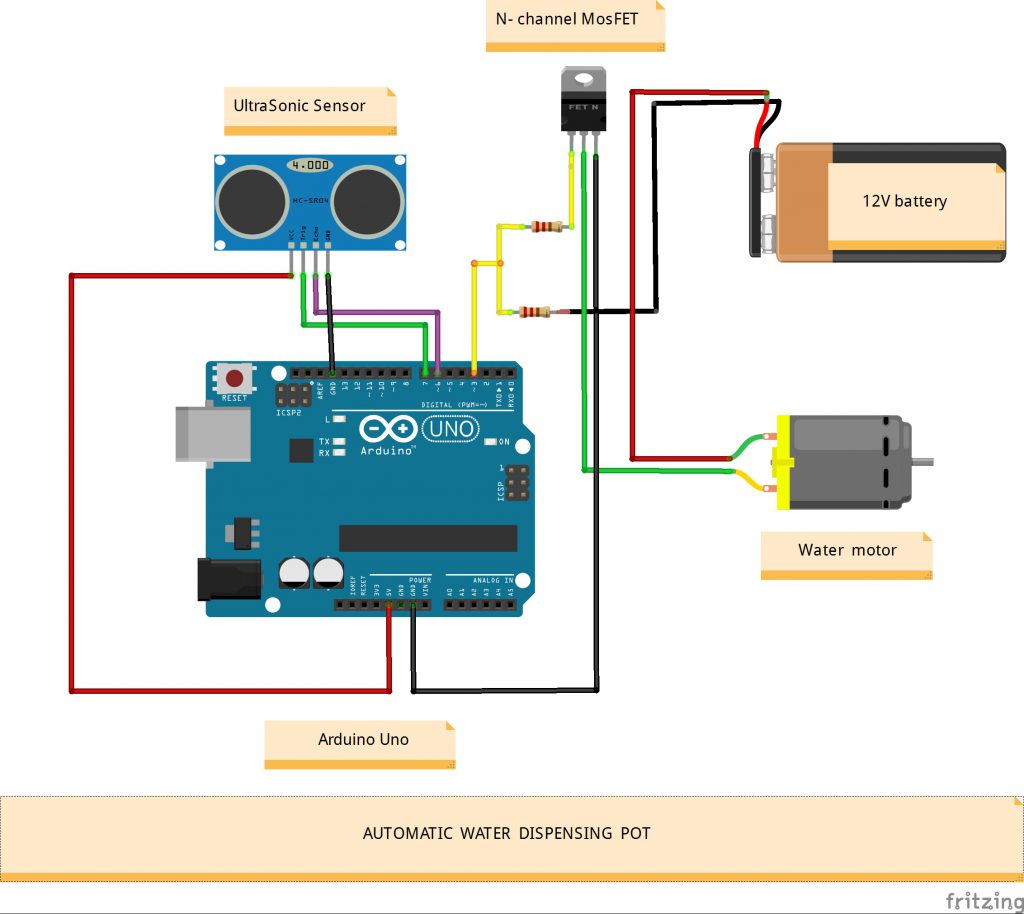
This project is for making an automatic water dispensing pot. Arduino Uno, Ultrasonic sensor and Water pump are the major components used in this project. Two batteries are connected for Arduino and Water pump power source.

Component Requirements:

  1. Arduino Uno
  2. Ultrasonic Sensor
  3. 12V Water Motor
  4. DC Motor Driver Circuit
  5. 12V battery
  6. 9V battery
  7. Cables & Wires

Circuit Diagram:

AutoPot- Circuit Diagram

Steps

1 : Connect the Ultrasonic Sensor with Arduino Uno

   Ultrasonic Sensor           Arduino Uno
   5V                          5V
   GND                         GND
   Echo                       pin 6
   Trig                       pin 7

2 : Connect the water pump with 12V DC motor drive

3 : Connect the DC motor drive OUTPUT pin with Arduino Uno pin 3

4 : Check the Connection

5 : Upload the program

/*
 * AutoPot - Automatic Water Dispensing Pot
 *
 * http://robolabz.com/blog/?p=4
 *
 * by Robolabz (www.robolabz.com)
 */

const int motorPin = 3;  // Water Motor PIN
const int trigPin = 7; // Ultrasonic Trigger PIN 
const int echoPin = 6; // Ultrasonic Echo PIN

float duration, distance;

void setup() {
  
  pinMode(motorPin, OUTPUT);
  pinMode(trigPin, OUTPUT);
  pinMode(echoPin, INPUT);
  
}

void loop() {
  
  ReadDistance();
  
  if(distance<10){ // Check object is closer
    
    digitalWrite(motorPin,HIGH);
    
    for(int i=0;i<100;i++)
    {
      ReadDistance();
      if (distance>10) { // If object is away,stop the motor
        digitalWrite(motorPin,LOW);
        break;
      }
      delay(40);
    }
    
  }
  
  digitalWrite(motorPin,LOW);

  
  delay(100);
}

/* Read distance to the object */ 
void ReadDistance()
{
  digitalWrite(trigPin, LOW);
  delayMicroseconds(2);
  digitalWrite(trigPin, HIGH);
  delayMicroseconds(10);
  digitalWrite(trigPin, LOW);

  duration = pulseIn(echoPin, HIGH);
  distance = (duration*.0343)/2;
}

Get the code from github : https://github.com/robolabz/autopot

This project is for learning purpose only and not a ready to use product.

www.robolabz.com